Tuesday, June 30, 2015

Making a gorytos, part III - belt attachments

I've never been able to track down evidence of how Achaemenid gorytoi were attached to the weapon belts beyond Persepolitan iconography.  That being the case, I have no idea whether my method resembles the original in construction at all, so all I can hope to do is make something that at least looks right and is functional.

The attachments are made to fit a flat suede band of the same type used for tying shoes.  They're cut and ground from 16ga. brass.  Since I have no drill press at the moment, I farmed out the drilling of holes and slots to Newtown Hardware House down the street.  I next rubbed a small half-round riffler over the edges of the slots to round them off and hopefully keep them from cutting into the leather too badly.


After being annealed one last time, the upper section of each slot is hammered using various steel bars and rods to shift it out of plane relative to the rest of the piece.


The leather band should now pass through the slots even when the attachments are held flat against a surface.


The attachments are to be nailed down, two on either side of the wooden spine, using oversized 5/8-inch upholstery tacks.  These are, unfortunately, only brass-plated steel, so they can't be polished; thus the brass belt attachments are left dull from annealing so as not to clash with the tacks' antiqued finish.  The usual arrangement of rivets or nails on the front of the gorytos seems to be a lower cluster of three and two pairs above it, but there are a few examples of a single upper pair, which is fortunate, as I ran out of brass plate at this point.

One last note:  Given the cross section that I picture for the wooden spine, it seems likely that the shanks of the lower attachments will have to be bent to angle upward and nailed in with great care.  Since the lower attachments are to be the load-bearing ones, the angle at which they would go in if they remained perpendicular to the inward-tilting surface seems like it would make them want to yank out under pressure.

Until archaeological findings come to light, it's not impossible that gorytos belt attachments were made in a manner similar to mine.  I would, however, sooner expect that if they were made of metal, they would have been cast to shape.

Friday, June 26, 2015

Plan for a gorytos spine

After further discussion with the good folks over at Hippeis, I'm going to see whether I can commission a carved external spine based on the ones seen at Persepolis (the type that I initially interpreted as a folded top strip of leather).  I may or may not be able to get a custom woodworker to create one for me.

It's a bit heavy-looking, but thin in cross section.  It is perhaps a concern that the wood in either the straight top or curved end would break easily since, if it's cut out of a plank, one section or the other will have a short, crosswise grain over a long area.  Splicing multiple pieces together could help alleviate this, but I'm not an expert woodworker, so we'll see what they have to say.

This design, with several inches of wood surface, gives the process advantage that the belt attachments can be simply nailed to the exposed spine after the leather is stitched down.

If it turns out I can't afford it, I'll fall back on the internal spine I've already made.  An exposed spine of flat cross section and uniform width and thickness would probably also be acceptable.

Monday, June 22, 2015

Making a gorytos, part II

Jesu, it seems to have been the better part of six months since I last posted on this topic, and we've only got another four until Marathon 2015!  Better get busy.

 The leather I selected is a smoked German-tanned buckskin from Crazy Crow Trading Post in the 14 to 16 square foot size.  To recap:  It appears that most leathers prior to the Hellenistic period were not vegetable-tanned but cured with fats in a process similar to brain-tanning.  The German tanning process is the cheapest widely-available example of such leather, and although it, unlike braintan, doesn't require smoking to preserve its integrity (due to the cod liver oil producing its own aldehydes), I believe smoked hide is preferable in the absence of evidence about what kinds of fats might have been used in Achaemenid times, plus the smoke masks the fish odor somewhat.

The 14 to 16-foot size gives plenty of hide for bowcase, cover and arrow pocket, plus some scraps for messing around with (I hope to use one as a hand wrap now that I'm learning how to shoot to the left of the bow staff, which is more painful).

Unlike a molded veg-tan, oil-tanned leather will require a spine to keep the gorytos from sagging when the bow is drawn.  Giannis Kadoglou pointed out to me that the gorytoi seen at Persepolis probably don't have an "upper strip" of leather, but a tall, exposed wood spine.  Similar ones are seen on the quivers from the temple of Aphaea statuary which included several archers in Asiatic dress.

However, I don't have access to a band saw at the moment, so I decided to use an internal spine made from a dowel.  This has been less than optimal.  My attempt at heat-bending it only went so far, and I wound up cutting the end into several pieces, sculpting them to fit and gluing and binding them to get a decent curve.

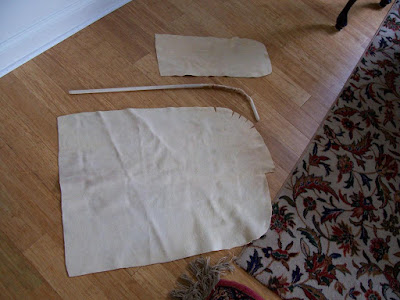
The leather is laid out and an outline of the bow and spine traced on with a pencil.  There has to be plenty of extra edge in the front to wrap around the spine and stitch to the back upper edge, locking the spine into its own little tube of leather.  I'm not sure I did well enough...

In any case, this is what the cut pieces look like before assembly.  You are looking what will form the inside surface.  I added one more bit to the curved end of the spine.

Flipping the main body over, the arrow pocket must be the first piece to be sewn.  It as well needs lots of slack, to fit the big blunt rubber arrowheads used in reenactment combat.  Since it's cut with extra room rather than stretched like a veg-tanned leather would be, this results in a highly puckered bottom edge.  I haven't figured out how to avoid that.

Next up will be tackling the belt attachment.

Monday, June 1, 2015

Don't try it 'till you nock it

The subject of Classical arrow parts other than arrowheads seems to have received less than its fair share of study, probably at least in part because everything except the point is organic and tends to decay.  I'm reliably informed by Hippeis poster arminius that reed arrows made from Arundo or Phragmites sp. require an insert or full separate nock.

The famous Epiktetos cup shows a Scythian's arrows with large C-shaped nocks.  For comparison, later wooden arrows from Miran in the Tarim Basin had bulbous wooden self-nocks that must have taken a great deal of work to shape.  Neither of these are snap nocks.  I prefer snap nocks, but it wouldn't be possible to create a profile like that with them.

As an exercise in exploring possibilities, I'm using cheap wooden beads (about a dollar a dozen) combined with bamboo skewers.  Other possible and likely more durable materials include bone and horn, but the wood is easily shaped and I think it will hold up well enough.

A cashier told me that the wood was probably pine and might splinter.  This hasn't happened so far, perhaps because I'm using very fine-toothed files - one backed, one round, to get the complex snap shape, which I may later reduce to a simpler and more open shape as per the historical examples.  I'm going to test them "raw" and perhaps rub glue inside if they do splinter with use.