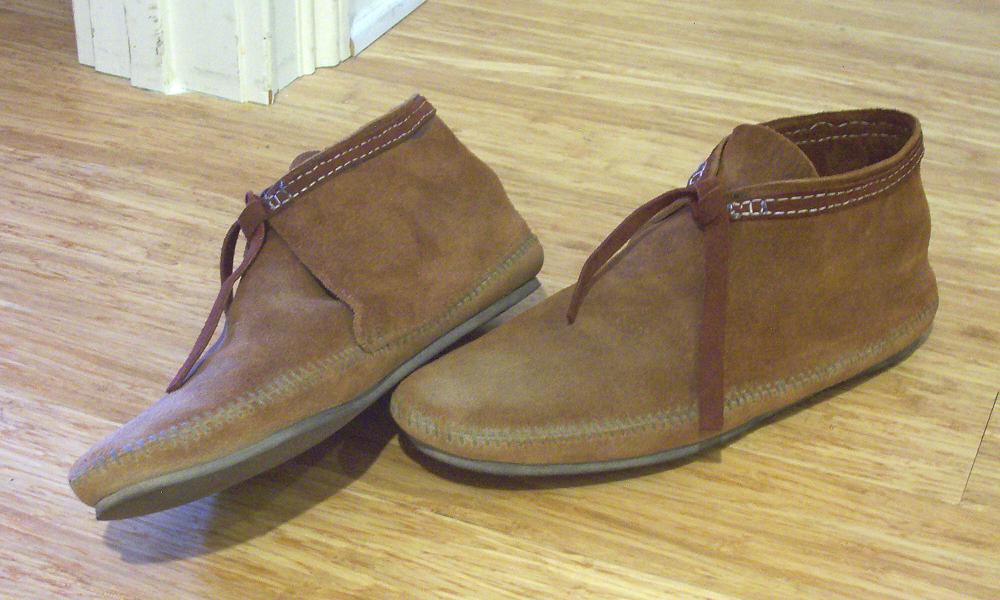
Earlier this year, I noted that the Minnetonka "classic fringe" boot could be improved by replacing the laces with flat thongs, and more recently that the side openings are actually accurate for the standard Medo-Persian shoe.
Art from the period of Darius to the Alexander Sarcophagus does not indicate shoelaces run through slits or eyelets. Thus, to the best of my knowledge, the thongs should probably be just stitched around the upper edge of the shoe. So this is what I've done.
Before doing this, I also managed to pull off the heel layers. I believe that this is the maximum extent to which this particular model can be improved. I tend to work slowly, and I estimate the total time in this case to have been about six hours.
Conclusion: If you find yourself in a hurry, the earlier slit method is still okay, but otherwise what you see above is what I'm going to recommend if you don't have the skills to make shoes yourself. (Again, the hardsole version seems to have been discontinued; softsole boots can be used as-is or you can tunnel-stitch or glue a leather or rawhide hard sole to them.) The significant remaining flaws are that the soft sole wraps too high up the sides, resulting in something of a "moc toe" look, and that the forward edges of the quarter slant forward instead of backward.
A guide to the Achaemenid Persian empire for reenactors, focusing on the Graeco-Persian Wars period. A quick guide to Persian history, society, religion, military, clothing and culture, plus links to reenactment groups and commemorations of the 2,500th anniversary of the Graeco-Persian Wars.
Monday, December 22, 2014
Sunday, November 16, 2014
Making a wooden akinakes scabbard, part III
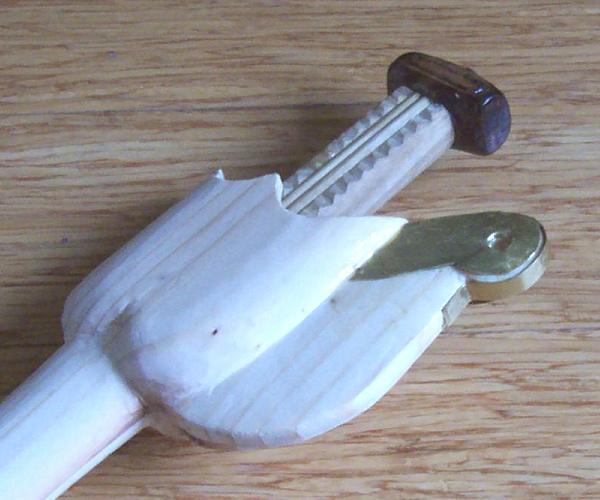
Next up is finishing the tab. Drilling a large enough hole for the attachment is simple enough. But since the little ear where the suspension is actually attached looks like a weak point to me, and furthermore pine is a rather weak wood to begin with, I'm trying to reinforce it, using sheet brass and epoxy. I don't know of any evidence for this sort of feature; probably the originals were made of a stronger wood. But it'll be covered with something (probably leather).
The chape is proving problematic. The originals were most commonly made of bronze and sometimes bone. Since I can't cast bronze yet and am having trouble finding a useable lump of bone (it should probably be made of the knuckle end of a cow, sheep or goat leg bone) here I'm using wood as a stopgap measure. Wood is only this side of allowable on the precedent of the scabbard from Egypt, and it should be replaced presently.
Again it's the very common goat motif, though others are sometimes attested. Unfortunately, what I thought was maple has turned out to be something quite a bit softer and more open-grained, also of less uniform hardness, so this carving is cruder than I'd like. I'll probably attach it with rubber cement so it can be easily pulled off when the time comes. A good friction fit will do most of the job, but a little adhesive is necessary, as I learned by nearly losing my pewter chape in the sand at Marathon 2011.
Friday, November 7, 2014
Just to pass the time
Since I'm at a standstill on my new akinakes scabbard until I can figure out whether to cover it in leather, parchment or linen, I redid the hilt yet again.
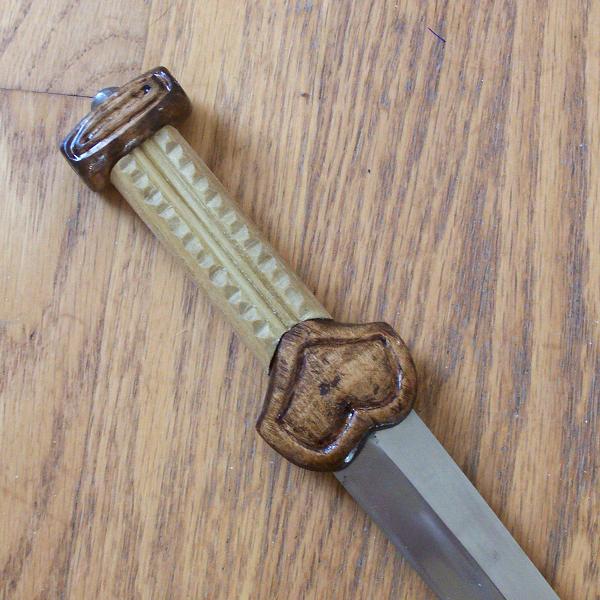
The new grip is made from a one-inch dowel of some very pale, soft and lightweight wood, probably poplar, which is almost certainly not a great choice but was all I had on hand. If it breaks, I can always go back to the old one. It's finished with linseed oil. And yes, it is slightly askew.
It occurs to me that Persian (aka English) walnut would be a good material for small carvings like this.
The pommel and guard are the same scrap maple ones it's had from the beginning, with a modern polyurethane sealer. The grip and guard are based on those seen at Persepolis (check out the last picture on this page). The pyramidal pattern is actually very easy to make with a straight chisel blade on your art knife once all the long grooves have been filed.
Since the akinakes guards are always hidden inside the scabbard throats, I copied the rimmed edge of the guard from one seen on the golden-hilted iron sword here. It's probably Scythian, but the grip and overall shape are not unlike Achaemenid examples.
The securing nut is also further ground down and partially sunken. It's still rather protrusive, but no longer resembles a nut so much as a small, shapeless lump.
Saturday, November 1, 2014
Leather and shoes, further updates
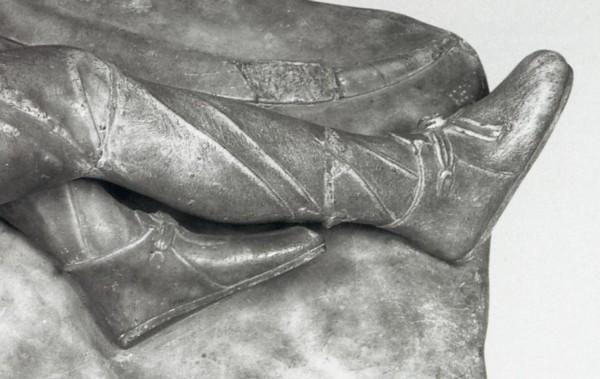
I've been in a lengthy and very informative discussion about leathers over at RAT, and it seems that grained leather may be on the table again. This is not inconsistent, since what I've read from brain-tanners is only that it's not easy to get the same softness from a hide without scraping the grain off; they never said it was impossible. Member Ivor (Crispianus) brought to my attention two things I found surprising: a modern repro of an Iron Age shoe, tanned with fish oil with the outer grain intact, and a detail from a piece of Hellenistic statuary showing a pair of Iranian shoes from the side.
It is a scan from Skulpter des Hellenismus. It shows that the ankle shoe in this period was made not from a one-piece upper (a la the Plains moccasins and Hedeby shoes I'd been using as a model), but from a separate vamp and quarter. This allows the quarter to rise as high or low as you like, whereas a one-piece upper has to have extensions sewn on if more than a certain height is desired.
(It further means that the Minnetonka moccasin boots are less inaccurate than I thought, and with a little modification, are actually the only off-the-shelf shoes I've seen that are anything like acceptable. I managed to pull the heels off mine recently, but since they only appear to be available in soft sole now, you could just glue or tunnel-stitch your own leather/rawhide soles without having to potentially rip the bottoms up.)
For comparison, I went searching for high-res pictures of the Alexander Sarcophagus, which is one of the best sources for Persian clothing at the transition of the Achaemenid and Hellenistic periods. In the restored-color versions by Vinzenze Brinkmann and Ulrike Koch-Brinkmann, the straps appear to encircle the ankle like those on Median shoes on the reliefs at Persepolis, but without the "branches" going down the sides. However, there is an extreme closeup over at Wikipedia which appears to show a faint vertical ridge on the central figure's shoe.
With regards to the Persepolis reliefs, Ivor pointed out that the vertical branches could easily be interpreted as strips of reinforcement running down the front edges of the quarter. The ankle strap itself - as he demonstrated by sewing an example - was probably just stitched to the top edge of the quarter rather than running through slits (as per moccasins).
The later example above is slightly modified, with the lace running through a single pair of eyelets, essentially making it a very simple chukka. In this configuration, the eyelets are under much more stress than in the first, since they are pulled forward to hold the top around the ankle, whereas when running the thong around the ankle (either through slits or sewing it on) doesn't pull the shoe leather, but merely squeezes it against the ankle, like a drawstring. Therefore, the later configuration would do well to have a reinforced eyelet.
Sunday, October 26, 2014
Update on Windlass javelin head
Kult of Athena has the new Windlass javelin or small spearhead for sale, so we get some better-quality pics. And, sadly, it has no mid-rib at all. As such, it's not really what we're looking for. Sorry.
Friday, October 24, 2014
Making a wooden akinakes scabbard, part II
Various personal business forced me to postpone further work until Monday, but work's progressed quickly since then. The core is essentially complete. I won't boother with photos of the front shell in progress because it's exactly the same process as the back shell.
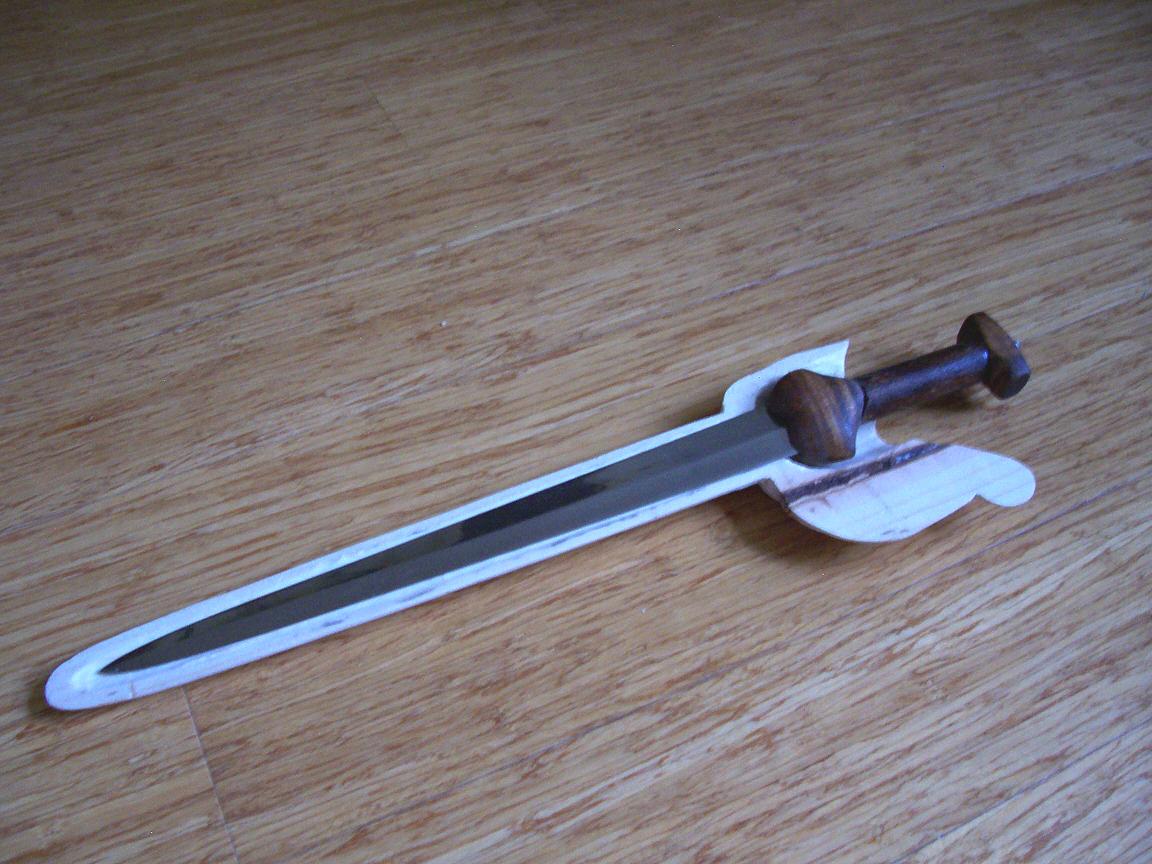
It's still somewhat too thick in several places, most obviously the lower body, considering how thin the blades are. I may do a little further sanding, though the very hard knot you see near the lower end has made reducing by hand evenly pretty difficult.
Although the amount of wood removed on the inside wasn't much, it still fit the blades too loosely, so I glued down a strip of felt to make it more snug before gluing the shells together - a solution cribbed from European swordmakers (though sheep and goat hide are said to be preferable, as a pointed blade could eventually catch in the felt, tear it loose and shove it down the inside, where it would be difficult or impossible to remove - quite an awful scenario). If the fit is correct, you can hold the scabbard upside-down without the sword falling out, yet still draw it easily.
Tuesday, October 14, 2014
Making a wooden akinakes scabbard, part I
Yep, I finally decided to cave and make a proper, solid wood scabbard, since I happen to have access to a band saw and belt sander this season. Mine will be based loosely on the tamarisk wood scabbard from Egypt, but I hope to make a separate chape. I also plan to cover it with something organic, possibly linen or rawhide, rather than the metal facing that once covered the Egypt find, because in my research it seems that isolated chapes far outnumber metal scabbard facings, and so I believe that most scabbards were entirely biodegradable other than the chape.
You'll also notice that it's considerably longer than the one from Egypt. Although often described as swords, the few genuine findings of Achaemenid iron fighting akinakai I know of were actually small-ish daggers, so the 12-inch blade on mine is really pushing it as far as historical accuracy. Perhaps the skill required and thus (presumably) high price demanded for forging a symmetrical double-edged sword was responsible for the preference of Persians (imputed by Greek pottery, at least) for the single-edged kopis, but I'm just running at the mout at this point. Anyway, on with the show.
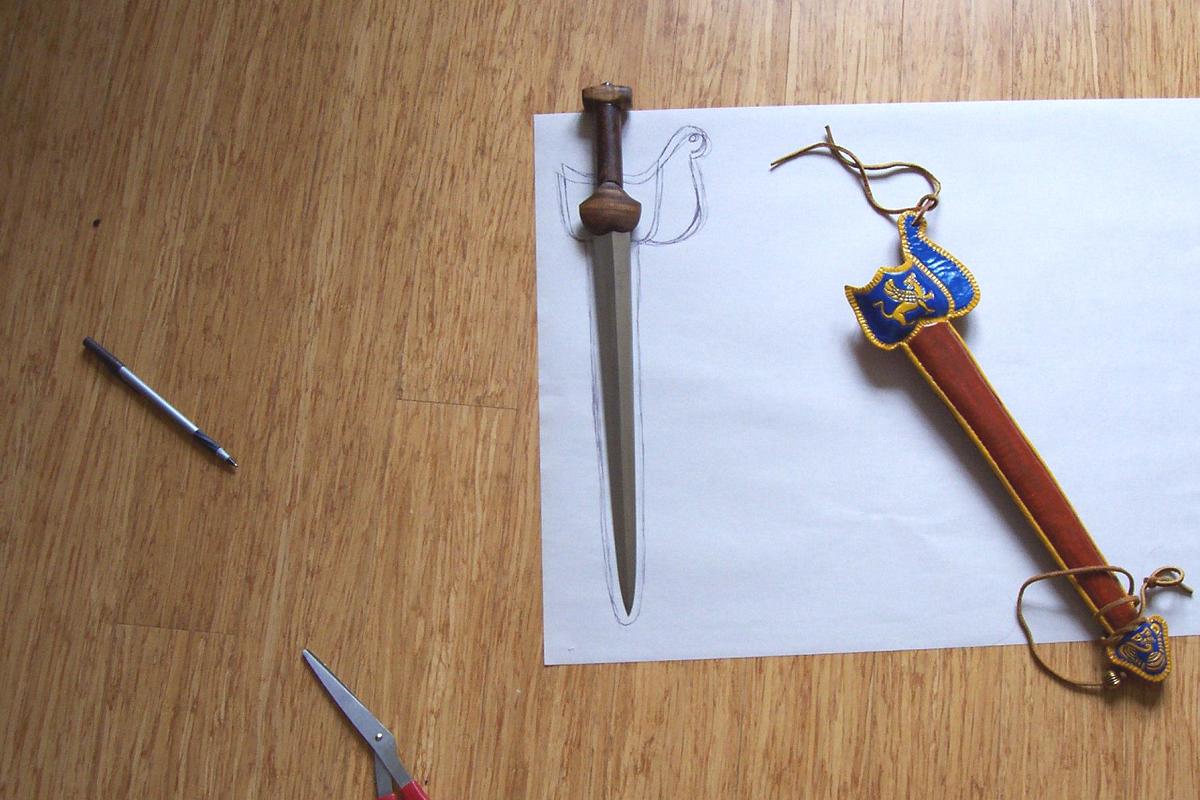
We start with a nice big sheet of sketch paper and a 1x6x48-inch plank. On the right is my molded leather scabbard from last year.
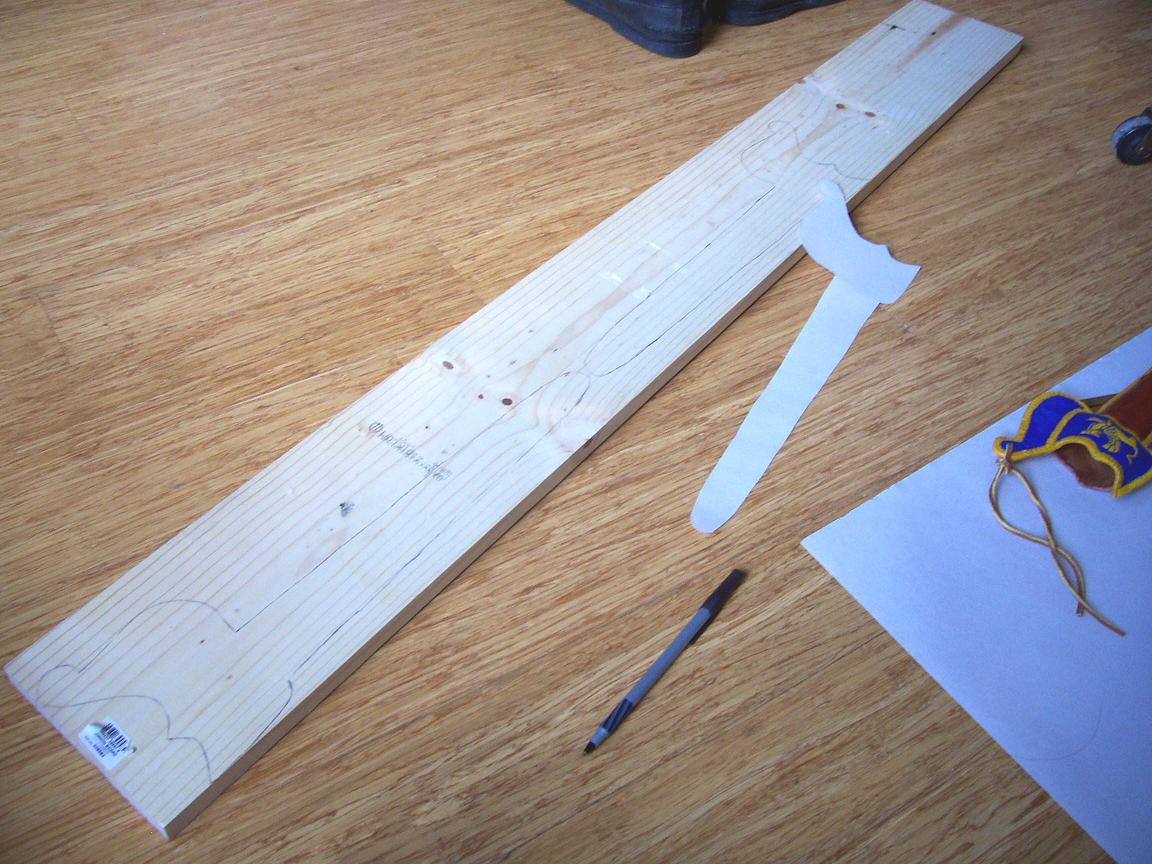
After tracing the main sections of the scabbard, I cut out the expanded part of the throat and traced additional sections for it on the main plank as well as on a 1/4-inch linden board, as the full inch-thick reinforcement seemed like too much. I didn't wind up using either of them; the main pieces seem to be thick enough on their own.
The pine wood is soft and cut easily even with just a manual saw, which made me wonder about its sturdiness. These initial cuts were done just to make it easier to carry. I plan to use the excess for a really cool retro raygun stock.
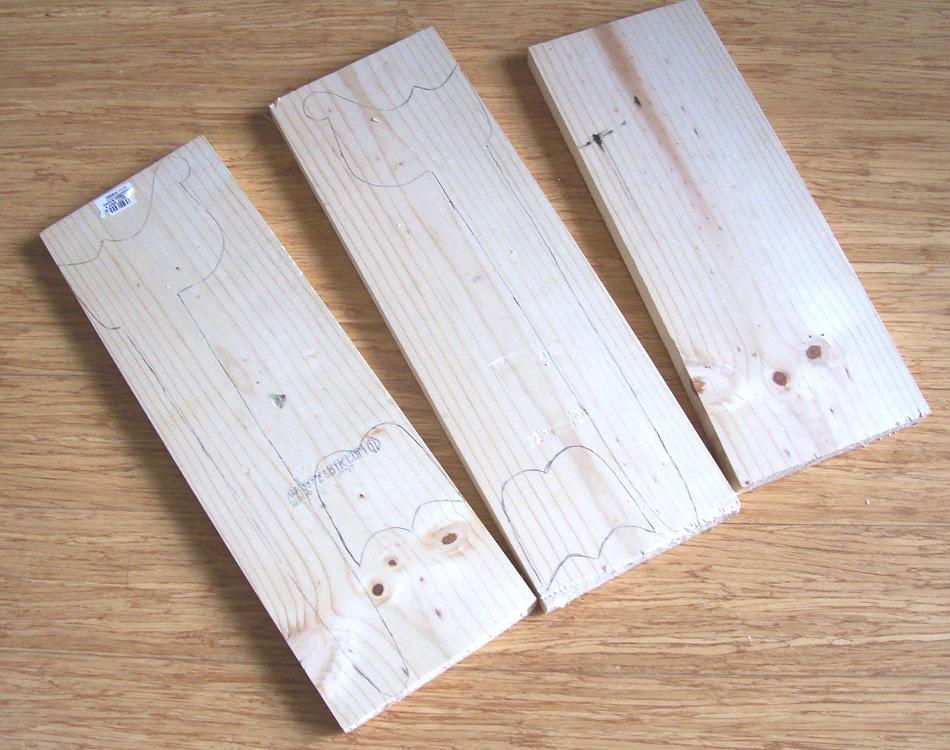
Since the band saw is best at straight cuts, I tried to get the most out of it with a set of lines for the first cutting-out phase.
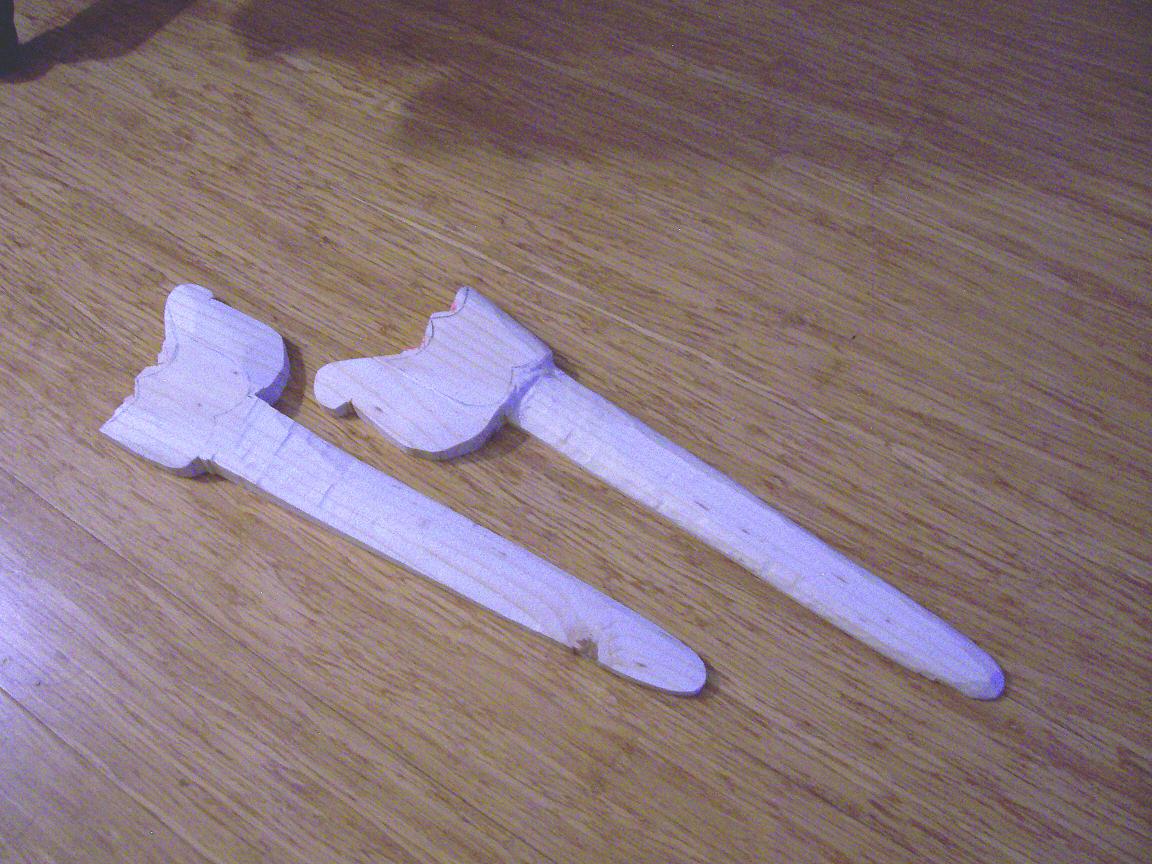
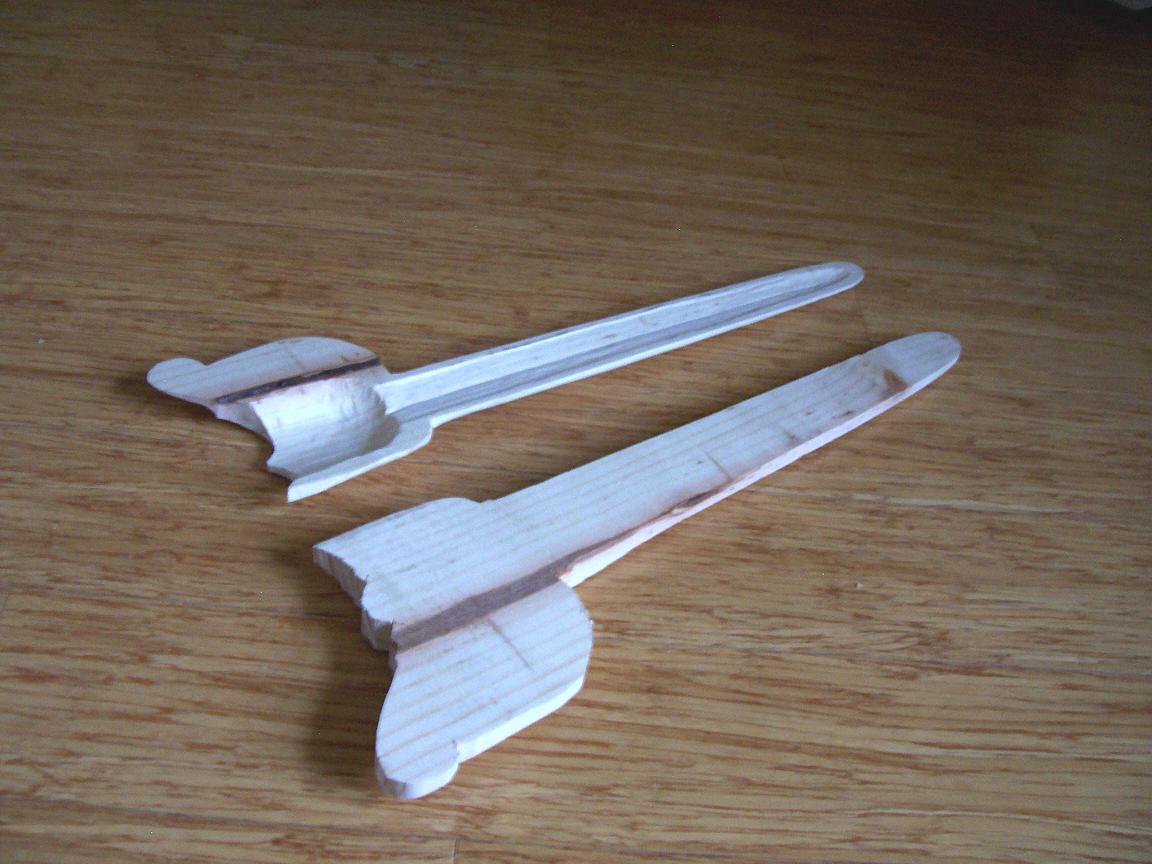
The belt sander helped reduce the manual workload, but it can only take you so far. On the bottom/left is the front blank after initial cutting and sanding; on the top/right is the back after ah hour of whittling.
Four days and literally hours of whittling, filing and Dremel-ing later, the back shell is finally done.
I know it sounds like I'm complaining, but I just want to be straightforward with you: It is a lot of work if you don't have specialized tools.
It's at this point that I question the wisdom of asking everyone to have wooden scabbards for their akinakai. If molded leather must be ruled out, I think a rawhide scabbard would still be a possibility, and it seems far easier. I also suspect that a moldable material is the origin of the balloon-like expanded throat of Achaemenid scabbards.
Friday, September 19, 2014
Possible spearhead?
Museum Replicas Limited has recently introduced a Greek javelin head which just might fit the bill for our sharp spearheads as well. It has a blade of less than five inches, a 7/8-inch socket, and weighs six ounces. If I was sure from the site photo that it had a distinct mid-rib, I'd recommend it out of hand as a cheap option.
Thursday, July 24, 2014
An akinakes from Bulgaria
Thanks to Alan Rowell for bringing this to my attention.
Ancient thracians: Another akinakes, Shumen region, Bulgaria
Compare it to the akinakes from Romania I mentioned earlier. I'm now swayed toward the opinion that the latter was a native weapon and not dropped by Darius' army.
Ancient thracians: Another akinakes, Shumen region, Bulgaria
Compare it to the akinakes from Romania I mentioned earlier. I'm now swayed toward the opinion that the latter was a native weapon and not dropped by Darius' army.
Friday, July 18, 2014
Wandering Sheep
I really meant to post this weeks ago. Wandering Sheep produces handmade felt goods, including tiaras. A flat stitched tiara is acceptable if it's low-crowned for a Persian impression, but if you prefer to reenact as a Phrygian or the ever-popular Scythian, you'll need a tall pointed hat and a properly molded one will look immeasurably better.
This link was brought to my attention by one of my Facebook friends, sorry I forgot who.
This link was brought to my attention by one of my Facebook friends, sorry I forgot who.
Saturday, June 28, 2014
My new personal blog, Addendum, is up. Barring something unforeseen, this is the only mention of it you'll ever see here because it's for contents that don't really fit here (mostly sketches and photographs).
Friday, June 27, 2014
New theory on Cambyses' lost army
(thanks Alan Rowell via Facebook) Olaf Kaper of Leiden University presents a theory on the fate of Cambyses II's army that disappeared during the Persian conquest of Egypt in 524 BC.
Sunday, June 8, 2014
Hide glue paint - the rain test!
Clockwise from bottom: acrylic, hide glue with natural pigment, hide glue with natural pigment and food color, hide glue with pigment and alum, and hide glue with pigment, food color and alum.
After an hour's soak and a little rubbing.
Wow! All the hide glue patterns washed out to the point of being barely noticeable, regardless of alum content. Either I'm missing some information, or this is just to be expected - if historical paintwork was done in this way at all.
Saturday, June 7, 2014
Last notes on this, I swear
The flower concho's petals and central circle in the OIP line art had a slightly rimmed appearance. Assuming this to be accurate, I attempted to duplicate it by masking just the edges of these features on my newly-etched concho and giving it a short dunk of about 15 minutes in the chloride.
I'd hoped that this would make the features stand out more. It didn't, but it does look a bit closer to the OIP drawing. But the edges should be defined by gentle swellings, not sharp-edged borders. I don't know how to correct this.
Interestingly, both the first and second etchings made a striated effect, always pointing toward the center, on all the exposed metal. Internal crystalline structure after forging? Something to do with the flow of etchant across the surface?
Lastly, I used some fine files to scallop the edges. At this point, any further cleanup will be unnoticeable to anyone but myself, so the project is for all intents and purposes finished.
Tomorrow, final results on hide glue paint!
Monday, June 2, 2014
Improvements for the Northern-style concho
As I've discussed before, the early Achaemenid weapon belt included a shallow bronze concho which often had a flower design cast on. In the absence of castings that could accurately replicate the originals, an acceptable substitute is a Northern-style concho. However, it still has some differences, the most notable of which is that it has a small round loop on the back instead of a riveted bar.
You could, of course, leave your concho the way you receive it. The alterations here are worthwhile if you happen to be set up for silver soldering (as of this writing, a low-end gas torch, tub of flux and coil of solder come to 20USD, give or take a few).
First the solder on the back is melted and the copper loop removed. Unfortunately, it's too short to do anything with, so I tossed that one and used one of those huge copper-plated staples from a cardboard box, simply bent to shape with pliers and trimmed with wire cutters.
The advantages of this design, aside from a more accurate shape, are that it holds the concho closer to the belt, and that it can be used with either a thick, narrow leather lace or a flat, wide thong.
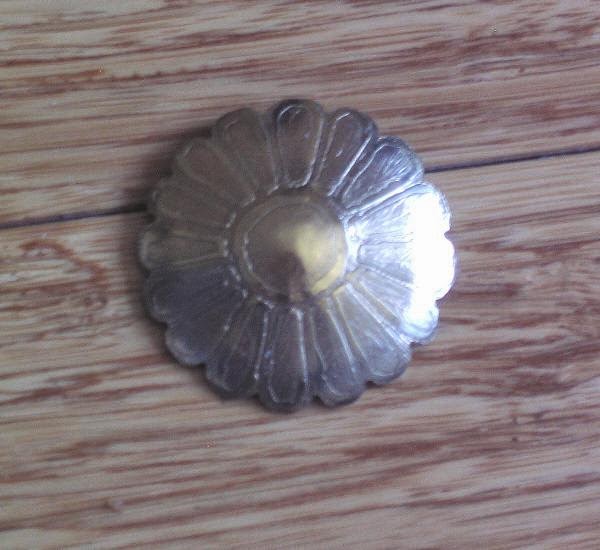
Before installing the back bar, I decided to beat the concho into a more conical shape with a small ball-peen hammer. Unfortunately, my forging skills are mediocre and left it slightly lumpy, so I covered that up by going ahead and adding the classic flower design seen on some historical examples.
These designs were originally cast on, but a similar appearance can be affected by engraving or etching. Since I don't know how to engrave, I etched it using some ferric chloride with permanent marker as a resist. The chloride took about half an hour to make a good 3D design.
In order to let the flower stand out, I didn't burnish it as thoroughly as I could have. Some of the permanent marker, dissolved with nail polish remover and scrubbed with a nylon sponge, tends to stick in the rough etched surface and provide a good contrast with the un-etched surface where the resist had been..
Image from OIP 69, which you should go download right now.
You could, of course, leave your concho the way you receive it. The alterations here are worthwhile if you happen to be set up for silver soldering (as of this writing, a low-end gas torch, tub of flux and coil of solder come to 20USD, give or take a few).
First the solder on the back is melted and the copper loop removed. Unfortunately, it's too short to do anything with, so I tossed that one and used one of those huge copper-plated staples from a cardboard box, simply bent to shape with pliers and trimmed with wire cutters.
The advantages of this design, aside from a more accurate shape, are that it holds the concho closer to the belt, and that it can be used with either a thick, narrow leather lace or a flat, wide thong.
Before installing the back bar, I decided to beat the concho into a more conical shape with a small ball-peen hammer. Unfortunately, my forging skills are mediocre and left it slightly lumpy, so I covered that up by going ahead and adding the classic flower design seen on some historical examples.
These designs were originally cast on, but a similar appearance can be affected by engraving or etching. Since I don't know how to engrave, I etched it using some ferric chloride with permanent marker as a resist. The chloride took about half an hour to make a good 3D design.
In order to let the flower stand out, I didn't burnish it as thoroughly as I could have. Some of the permanent marker, dissolved with nail polish remover and scrubbed with a nylon sponge, tends to stick in the rough etched surface and provide a good contrast with the un-etched surface where the resist had been..
Thursday, May 29, 2014
Hide glue paint tests - preliminary results
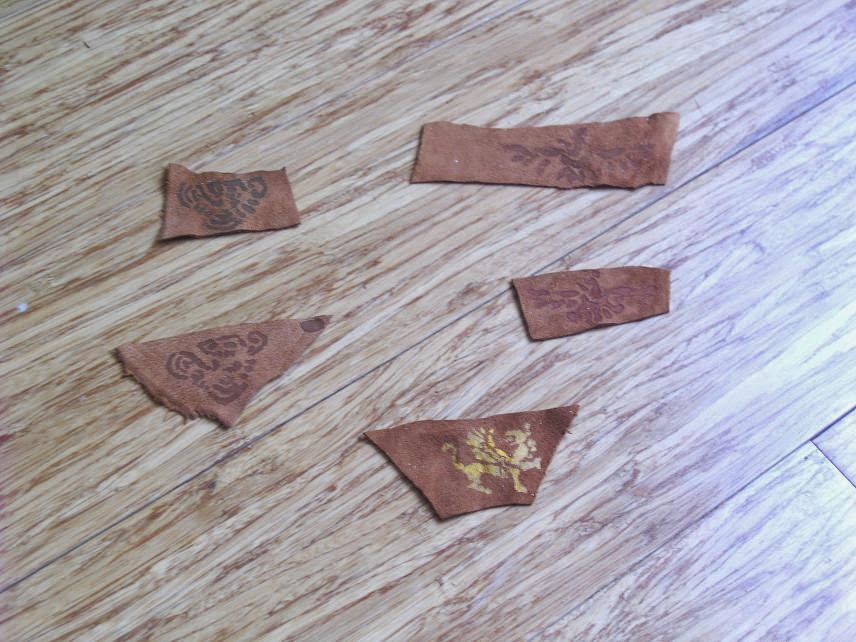
Achaemenid motifs on glove suede painted in acrylic (left), hide glue with added alum (top) and hide glue without added alum (bottom).
In the first batch (without alum), it took a water-glue-pigment ratio of about 5:3:2 to get the consistency I wanted. I am just now realizing that I scaled the mixture down wrong and added twice as much alum to the second batch as I should have, which accounts for why it was somewhat thicker than the first batch (premature gelling - the alum content was probably around 3-4 percent instead of 1-2).
The thick consistency of the second batch - also probably caused by stirring up as much of the pigment as possible, as I noticed the first time that it tended to settle - meant that it didn't soak into the leather as readily, making for a blobby-looking design. Since these test designs are very small, I think in more practical use it won't be much of a problem. You can try different amounts of water and find what you prefer.
The acrylic paint is very slightly glossy, while the hide paint isn't, but I wouldn't say the acrylic looks too bad. As for flexibility, the acrylic is far more flexible, but I think the hide paint has adhered well enough to the suede that it won't flake off.
Another
issue is that the only pigment I had in the house was raw sienna, which
when added to the glue, gave it a color almost identical to the leather
itself - you can only see the faravahar on the top swatch because the
painted areas reflect light differently. This will make the last test hard to judge; I may try again with some food coloring added just to mark clearly where the paint is to begin with. The last test is to soak the swatches and see whether the paints run; this will hopefully show us how our stuff will handle rain. The acrylic paint manufacturer suggests "air-curing" it for one week before cleaning, so I'll be trying this out in a week and will probably report the results on Friday.
Tuesday, May 27, 2014
Hide glue paint tests - gearing up
Thesis
It is possible to paint soft-tanned leather goods using basically period materials.
Background
Animal glue is one of the oldest-known adhesives in the world, second only to plant resins. Archaeological evidence dates back to the Neolithic, written references back to the Bronze Age. It's made by cooking down animal tissues that are high in collagen, a connective protein; these tissues are typically bone, tendon, or particularly skin (strictly, hide glue is only that made from skin). Today it's still widely used by woodworkers, especially those engaged in making and repairing stringed instruments.
Animal glue is also used as a paint sizing, the substance in which the pigments are dissolved and by which they adhere to the canvas. Plains Indians used a thin solution of glue for painting buckskins. It's supposed to soak partly into the hide, remaining semi-flexible - the rough, "open" finish on brain-tan probably helps with the absorption. Since the most common leathers of the ancient Mediterranean were similar to brain-tan, this sounds like a plausible solution for us.
Standard "hot" hide glue must be held at around 140 degrees Fahrenheit while working: colder and it will gel, much hotter and the collagen will begin to break down, weakening it. However, hide glue can be kept liquid at room temperature by the addition of an anti-gelling agent, commonly salt or urea. While I can't prove that it was used historically, urea was always readily at hand in the form of urine. That may sound disgusting, but when you think about some of the things people had to do to make leather, adding pee to glue suddenly doesn't sound that farfetched. Thankfully, we don't have to trouble ourselves with that, because premixed liquid hide glue is already available at some hardware stores.
While liquid hide glue has a lesser reputation than hot hide glue due to the urea weakening its bonding power, and unused portions will break down over time, Stephen Shepherd of Full Chisel has argued that fresh liquid hide glue is still one of the stronger glues available. In any case I'm not sure whether the strength of the glue is as critical in painting as it would be in woodworking.
There is one other consideration: While Greece is pretty dry in the summer, most of our stuff would have been exposed to rain sooner or later in ancient times. Hide glue isn't waterproof by itself, but can be made highly water-resistant by the addition of a small amount of alum. Again I have no reason to think this was done, but alum was used as a mordant and leather tannage, so it was at least available. The containers and brushes used with glue that has alum added, must be washed thoroughly before the paint dries or it will be difficult or impossible to wash out afterward.
Materials and methods
Liquid hide glue
Water for diluting glue
Alum (aluminum sulfate)
Earth pigment
Suede leather scraps
Alum is recommended in amounts of 1-2 percent. Too much can cause the glue to gel prematurely. Assuming it has a similar weight to salt, for one ounce of glue (before dilution), I estimate one twentieth of a teaspoon would be the correct amount, but since it's so hard to measure in such quantities, I'll try it by eye - slightly less than half of an eighth of a teaspoon ought to be close.
In order to mix the alum thoroughly into the glue, it should probably be dissolved in the water first. An exact ratio of water to glue is not given in the Crazy Crow instructional, so I'll begin with a 1:2 ratio which hopefully won't make it too dilute to begin with. Let's start with a tablespoon of glue, a teaspoon and a half of water, and half of a half of an eighth of a teaspoon of alum.
The bottle on the left is a modern acrylic leather paint I have on hand, which I'll be comparing to the hide paint to see whether it's acceptable as a more convenient substitute.
Questions
Does hide paint remain flexible enough when dry for use on soft leather goods (gorytoi, bags, clothing)?
Does waterproofing with alum affect the paint's flexibility?
Does acrylic leather paint provide a similar appearance and degree of flexibility and water-resistance to alum-treated and alum-free hide paints when used on the same leather?
Sunday, May 4, 2014
Easy improvements for the Minnetonka ankle boot
In the past I've suggested the Minnetonka fringe hardsole boot as a quick option for Medo-Persian shoes. These are what I wore at Marathon 2011.
As noted previously, they tend to pick up dust and the two-piece construction (vamp and quarter) leaves side openings that let sand in the sides (not present on Medo-Persian shoes, which were probably like Plains moccasins in construction, i.e. one-piece uppers). Since I'm now aware that period leather likely had a rough finish more often than not, the dust is not an issue. The side openings are but I'm looking into stitching them up or perhaps adding fabric panels.
In the meantime, another quick way of improving the boots' appearance, after you've cut the fringe off, is to replace the laces with flat suede thongs. Art stores such as Michael's (in the U.S. and Canada) sell strips of 1/2 by 36 inches, which is just about right for our use.
Undo the laces and pull them out. With a seam ripper or a craft knife with an angled blade, cut the stitches holding on the upper strip of leather forming the "tunnel" through which the lace was inserted. There are two seams, one inside and one outside of the shoe.
To the now-exposed upper part of the quarter, add vertical slits through which you can insert the thong - not, of course, too close to the upper edge; about a third of an inch away should be safe. I find a double slit at the back of the quarter and a single slit on each side of the front to be sufficient to hold the thong in place while leaving most of it exposed (as was the case with the thongs on Achaemenid shoes). Tie the thongs in square knots rather than bows, and trim them as you see fit.
Wednesday, April 16, 2014
"A Lytell Dye Boke"
Drea Leed of Elizabethan Costume tests historical dye recipes. Worth a look even if your group doesn't require naturally-dyed fabrics (XMFM does not) for insight on what historical at least looks like. Linen seems to take dye much less readily than wool, so madder linen is a dusty pink instead of a deep or rusty red, and indigo linen tends to be baby blue rather than anything approaching the deep steel blue associated with the name "indigo."
Wednesday, March 26, 2014
Will the retractions ever stop?
So, here's where I am with regards to leather now:
Most sources on fat-cured leather, mostly relating to Native American brain-tanning, indicate that the the grain side is normally scraped off before the fat is applied. It does not have to be, and obviously cannot be in the case of furs, but doing so does allows the hide to absorb the fat much more readily.
The upshot is that contrary to my previous recommendations, prior to the introduction of veg-tan, the leather available to the Persians and other ancient West Asians most likely (or most likely usually) did NOT have a smooth finish. Rather, it may have been lightly napped or sueded.
Just to be clear: It is possible that smooth leathers were available or even common. It's just that given my current understanding, it's unlikely that they were common.
Therefore, my recommendation is that you look for any of the following:
True brain-tanned - available mainly from small craftspeople.
German-tanned - deerskin cured with cod liver oil.
Double-sueded cowhide and splits - mostly chrome-tanned. Look for those labeled "glove-tanned" for the softest texture.
If you have only "commercial" buckskin with a grain side or smooth glove leather on hand, you can just turn it inside-out as long as the flesh side has a fine nap.
The sources available on the Internet are endless, but off the top of my head, a few in the U.S. would include Crazy Crow Trading Post (German-tan, commercial deer and bison splits, and cowhide), Tandy Leather Factory (pigskin and cowhide splits - I don't know about the finish on their deerskins) and Braintan.com. All these companies also sell rawhide.
Thursday, March 6, 2014
Atlanta Cutlery Arkansas toothpick blade
This is an item I've previously considered for use as an akinakes blade, but have only just gotten my hands on. I actually ordered for another project entirely, but might as well comment on it here.
The blade, advertised as 3/16 of an inch thick, is actually only 1/8 inch, and due to its breadth at the shoulders, gives the impression of being rather thin. Together with its acutely tapered profile and full 12-inch length, I cannot say it resembles the few examples I've seen of the Achaemenid akinakes very closely. On the plus side, the tang is much wider than it appears in catalogue photos, and the edges curve smoothly into the point.
To sum up, I was already doubtful about whether to recommend this blade for this use, and I'm now even more so. I'm reluctant to rule it out because I know of no comparable items in this price bracket. Also, given the greater known variations in size and shape, it would probably be acceptable as a Scythian dagger.
Sunday, February 9, 2014
"Tracht der Achaimeniden" illustrations available online
Sean Manning of Book and Sword alerted me that Dr. Stefan Bittner has put the illustrations to his thesis online. This is a great collection of line drawings copying and clarifying a wide variety of ancient illustrations of Achaemenid clothing and military equipment, very helpful if you find monochromatic rock carvings a little unclear.
Saturday, February 1, 2014
Madder-dyed leather
To give you an example of what results a period leather dye might produce, a recent thread at RAT alerted me of several items Martin Moser made and dyed with genuine madder.
Vindolanda Calceus
Drawstring Bag
As you can see, it's a bit rusty rather than pure, deep red. The leather is alum-tawed so presumably it would have been a light color to begin with. Possibly leather that starts off brown, like a fat-cured hide that's been heavily smoked, will produce a somewhat deeper (albeit brownish) color.
Saturday, January 4, 2014
An akinakes and scabbard from Romania
While I would normally consider something from the edges of the empire unlikely to be representative of typical Achaemenid material, it's been suggested that this dagger from Medgidia is an artefact from Darius the Great's invasion of Scythia, specifically a battle with the Getae. I don't entirely know what to make of it.
Unfortunately, it didn't come from a controlled dig, so its exact age and origins are less likely to be determined. If it is Medo-Persian, it exhibits some unusual features. The scabbard has no chape (granted, this may have fallen off) or guard-enveloping throat; these features put it more in line with examples other than Medo-Persian ones. The general style of the hilt is common to multiple countries, including Iran. I'm not familiar enough with the decoration to know whether it would help indicate origins.
It may be Scythian, given Thrace's proximity to Scythia, or it may even be of native Thracian manufacture, but if it was actually brought from the core Achaemenid territories by Darius' army, it may be precedent for a less rigid image of what reenactors ought to be carrying.
Subscribe to:
Posts (Atom)
