Wednesday, December 2, 2015

Scythian bow from Upshot Archery

Thanks to Giannis Kadoglou for bringing this to our attention over at Amphictyonia's Facebook page.

Upshot Archery's Scythian bows have the most accurate shape of any low-end Scythian bow I've seen:  a more angular profile than the popular Grozer Old Scythian, they also have the asymmetric shape seen on many period bows but rare on the replica market, and appear to have thicker limbs.  Being made of PVC, they're extremely cheap, even at the regular price of US$100.

I am not sure how well the faux birch bark finish would pass inspection at any given reenactment event, though I expect it would be fine at Amphictyonia, and in my opinion the profile more than makes up for any possible drawback in that regard.  The two pieces currently available, as well as the one in the review below, are only 30 and 35 pounds, so it may be that Upshot focuses on low draw weights for this model.

The listed strung length of 52 and 55 inches/132 and 140cm make it somewhat larger than the Grozer and it will obviously require a larger gorytos because of that.  (Personally I've been hoping to find a smaller bow...)

BackyardBowyer posted this review to YouTube in July:

Tuesday, December 1, 2015

Marathon 2015: A Retrospective

The wind howls along the beach, flapping the canvas of a single strange house-shaped tent.  Outside, a small crowd has gathered to watch four men in shining bronze armor go through their ancient paces.  It's the first of November, the last day of Marathon 2015, and I'm too tired to even change into my costume, but I'm still standing there, saying hello to the public as best I can with my total inability to speak Greek.  And in spite of all the things that went wrong, I don't regret it.

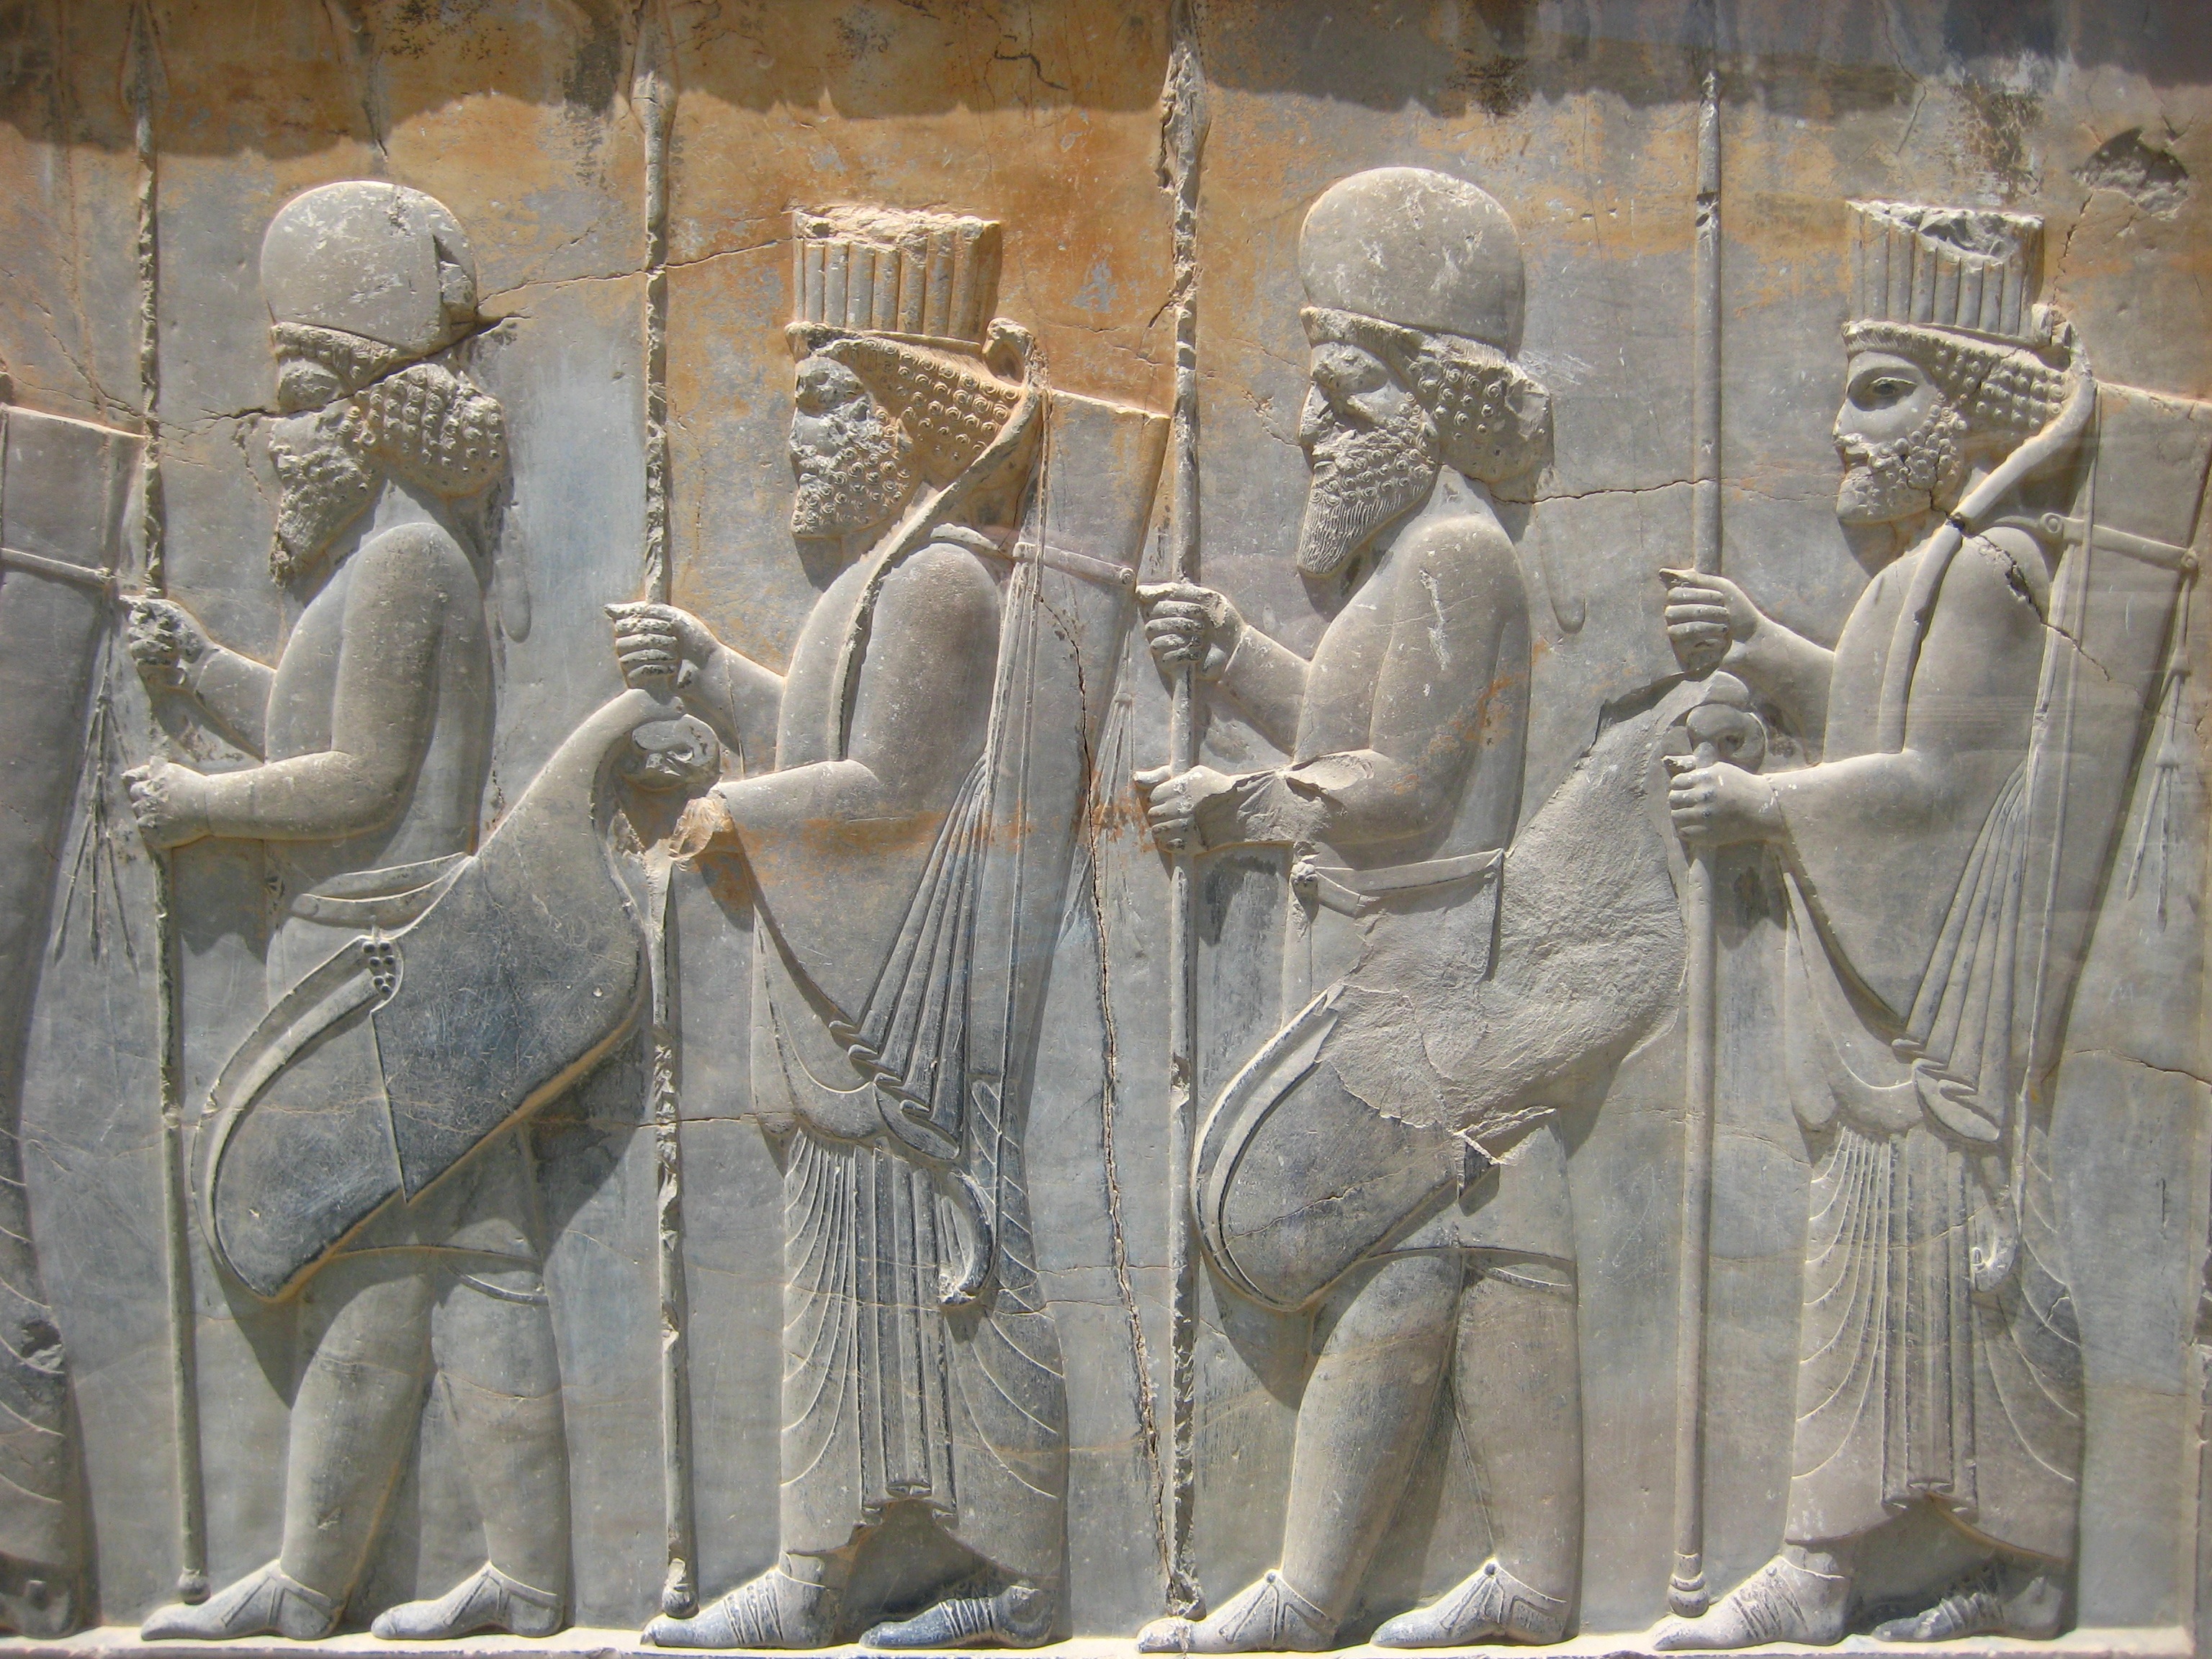
It's a truism that the Battle of Marathon shaped the modern world.  A long and largely-successful campaign by the Persian empire to solidify control of its Greek corner came to an abrupt end with defeat by the army of the city-state of Athens (and their Plataean allies), which went on to become the dominant political and cultural force in Greece over much of the fifth century BC.  How would things be different today if Athens had been conquered?  I don't know.  "If not X, then not Y" doesn't strike me as a reliable formula when we're talking about something so complex as human history.  I balk at the notion of trying to say what would have taken place when we're talking about two and a half thousand years and countless historical variables, and I disagree with the cliche that democracy would have been smothered in its cradle.  But what did happen is an epic story in its own right, and it's an honor to be able to stand on the very spot and pay my tribute to it.

For five days, we - fifty history geeks like myself from across the globe - pitched over a dozen tents, did battle on the beach and gave presentations on everything from ancient warfare to ancient cosmetics before crowds of students and sightseers.  On the last day, someone asked me if the government paid us to come here.  No, I said, we paid for our own plane tickets and equipment.  "Why do you do it?" he asked.  "Because we want to," I said.  He looked a little surprised and left the obvious next question unasked.

Reenacting is something you really, really have to want to do.  It's hours of stitching, cutting, gluing, grinding, and even hammering or pouring red-hot metals until your fingers are raw and ringing.  It's bank statements that make you wince and endless hours trying to sleep in a tiny airplane seat.  It's running until your lungs hurt before being knocked flat on your back and trying to die convincingly.  And it's really hard to explain what makes it worthwhile.  But it is.

It's a joy to be able to connect with people over such out-of-the-way interests, to be able to talk in terms like "trilobal" and "othismos" and have the other person understand what you mean (and not be bored by it!).

You can't not be happy hearing the "ohhh" of a classful of kids watching the archery demonstrations.  And at the same time I find that even when I'm in a position of educator, I have a lot to learn.  For years, I've been using the same straight draw on my old-fashioned recurved bow that I learned on a modern compound bow at college; it took careful instruction from heavy warbow archer Chris Verwijmeren for me to get the proper power and accuracy from the one I'm now using.  After a week, my left shoulder was just about recovered.

As well in the area of reenactment combat, I found I still need to get the basics down.  Fighting with Alan Rowell, I had it in my head that I shouldn't "die" until he feigned an attack with his knife, even though he'd already said that it wasn't blunt and he couldn't safely do so.  He had to knock me over with his shield to kill me, whereupon I spontaneously decided to wave my dagger in defiance, and could well have hit him in the face.

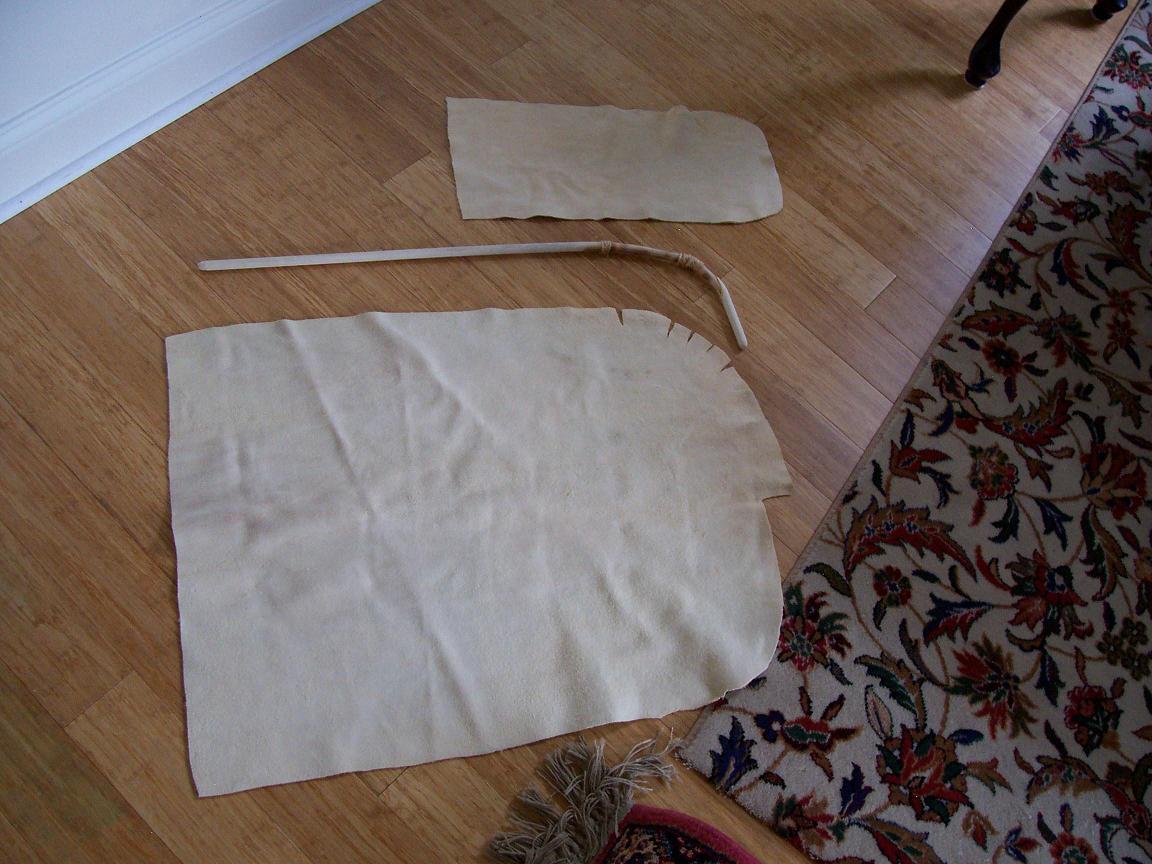
I found that a single-layer lining isn't good enough for my stupid skin; I needed to wear my linen tunic (with its multi-ply collar) under my wool one to stop my rash getting any worse.  I found that all the glue and sinew wasn't enough to stop my small-socketed arrowheads from simply popping off the arrows when embedded in a wood target.  And I'm now determined to obtain a good sharp belt knife like Jax Reeder has, because funnily enough, there's still a need for things like that, even for just opening boxes or cutting rope.

I'm sorry to say that I learned firsthand that you can't be too cautious with visitors.  Until now I'd been lucky not to be in the position to keep an eye on people around our weapons, and anyway I'd say 98+ percent of visitors are intelligent and respectful about them.  But then there are the times that you're deep in conversation with someone, and then you notice a kid picking up your bow and trying to string it backward.

For the most part, though, our relationship with the Greek public has been pretty good.  Which leads to the inevitable and innocent question:

"So will you be back next year?"

I grow timid.  I say things like "Well, maybe in a couple of years from now."  But it's almost a lie.  The truth is, we have no idea.

Marathon 2011 was a triumph, the first international event of its kind in Greece, commemorating exactly 2,500 years since the turning point of the Graeco-Persian Wars, showing the public what we're about, and concluding with the formation of Amphictyonia.  For me, Marathon 2015 was a bit of a letdown.  It's not just the fact that most of the reenactors had to pack up and go home a day early because of the PNO ferryboat strike on November 2.  It's not just the chilly and gray weather.  It is, rather, the fact that pulling off an event of this nature isn't any easier now than it was four years ago.  I expected a hundred or more reenactors this year; instead, we got fewer than in 2011.  As much as we love the hobby, maintaining enthusiasm for an event that costs each participant thousands of dollars, hundreds of hours of labor, and wrangling for a week or more off from their real jobs, is no cakewalk.  As for our misunderstandings with the municipal government of Marathon - I won't deign to comment, except that a feeling of quiet discouragement was in no way difficult to find.  I wonder if every iteration will be as if it were the first one.

Will there even be another, a Marathon 2019, or Thermopylae 2021?  I asked Jevon Garrett of Taxeis Plataia, one of Amphictyonia's leading voices.  He said that while he was sure there would be future events in Greece, participants have been looking into other venues, for example Plataea.  The mixed opinions of reenactors on this year's event may well amount to a tacit "no" to further events at Marathon - something like this simply doesn't happen without a lot of enthusiasm.

We're now almost at the halfway point between the 2,500th anniversaries of the first and second Persian invasions of Greece, immortalized at Thermopylae, Salamis, Plataea and Mycale.  It may already be time to leave stop thinking about how we can redo our last event bigger and better, and start thinking about what we haven't done before.

Monday, October 19, 2015

Making a gorytos, part V and last

The gorytos body needs to be carefully fitted to the spine.  Mine required extra trimming since it was initially planned to wrap around a hidden spine.

I used rubber cement rather than true contact cement, both because I was working indoors and because rubber cement allows the glued surfaces to be slid around a bit after contact rather than bonding instantly.  Check again to be sure the bow fits and slides out easily enough without being too loose.

I marked for the line of stitching by pinching my thumb and forefinger together, putting one on the edge of the leather and pressing the other into the surface, then running them along the edge to make a shallow groove.  This is obviously not a method guaranteed to give nice neat results, but it worked tolerably well.  I then marked for the stitch holes with a pen, 1cm apart.

Drilling for stitch holes would've been much easier if I'd had a drill press, as holding a heavy power drill stable while pressing it down via a thin metal rod was precarious, and I broke one drill bit in trying to do so.  The size of needle and artificial sinew I used worked best with a 5/64-inch bit.  Not to mention a drill press would've allowed the holes on the back side to come out in a neater line.

On the other hand, I soon found that the leather edge on the back was a little further back than on the front, so with the power drill I was able to angle the holes in slightly.

In Greek art, gorytoi often feature a decorative crenelation and, on at least one example, a row of dots lined up with it.  Such a design might have been appliquéd or done in hide glue paint.  Although there's no way of knowing, it's possible that the gorytoi at Persepolis once featured such decoration as well.

I worked up the design on mine lightly in ink, with a little calculating of the available space for each square and measuring to keep the dots exactly halfway between the squares and the gorytos' edge.  The paint would go a little bit over the lines to cover them up.

Finding the correct point of balance for the belt attachment required inserting the bow and full allotment of arrows and hanging the leather for the cover over the bow.  I unfortunately failed to take any process photos while nailing the attachments down, which was a tricky process, especially on the back (having done the front first, the big domed tacks prevented the front from lying flat while I was nailing the attachments to the back, and the tacks kept shifting and bending).

At this point, the bowcase would be functional and ready to take to the show, but not quite finished to the degree that I would like.

Making the cover:  The German-tanned buckskin is soft enough that it can be easily basted into place with a common desktop stapler (no, this is not a product endorsement).  I based it with the slightly rougher side out, since I intend to invert it after stitching - the originals in art don't show any seams.

To prevent the fit over the bow from being too sloppy, the seam should be no wider than necessary, so some trimming can be done at this stage.  I can't say I know for certain what a good width would be, as mine didn't turn out with a good precise fit anyway, but a quarter-inch seemed about right for strength.

Mark the seam as above.  Using more ink is fine, since it won't be visible on the finished cover.


The stitch holes are a centimeter apart, though for light stitching like this, a closer spacing might be preferable.  Without a thick slab of wood between the leather layers as on the bowcase's body, the stitch holes can be poked with a simple hobby awl.

The finished product.  Note the slightly sloppy fit of the cover.  I should have made both it and the sloping top corner of the spine that it sits over a bit longer, so that the cover doesn't slip off the spine as readily, but all in all, I think it will prove sufficient.

Monday, October 12, 2015

Making a gorytos, part IV - spine construction

I've had some difficulty keeping in contact with custom woodworkers to get this spine made, but if a reciprocating or band saw is available (luckily my uncle had one), a flat J-shaped spine may be pieced together from a plank.

To begin with, the leather gorytos body is used to trace a cardboard pattern.

The pattern is traced in sections onto a 48x6x1/4-inch poplar plank (the ones from Home Depot actually measure 5.75 inches wide).

The cut pieces are to be made into a two-ply spine with the grain of the two layers running perpendicular to each other, to hopefully reduce the risk of splitting.  The lengthwise-grain pieces will be on the left (outside) of the spine when the gorytos is worn on the left side of the body with the curved end pointing forward.

Due to the aforementioned slightly inaccurate labeling, an extra 1/2-inch-wide piece needed to be added to the lower end of the curve on the lower face.

The spine is glued together with a waterproof wood glue, and placed on a flat surface to dry.  Using scrap wood, half an inch of shims are placed all around it to make sure the weights sit evenly.

Twenty volumes of an encyclopedia form the weights to try to keep the spine completely flat as it dries.

I let the spine dry for two days to be absolutely sure it wouldn't warp.  Since the inside edge won't be visible, it only requires further cleanup if there are any large pieces jutting inward.  The outside should be shaved and sanded if necessary to achieve evenness between the two layers; the edges can also be rounded.

Either the floor or distribution of weights must not have been perfectly flat.  Lamination failed at one point where the back layer bent away from the front.   I worry that if this bit is allowed to flex in relation to the rest of the spine, it could crack.  I think this is an unlikely concern, but there's no point in risking it.

After the wood putty dries, the area is shaved and sanded down.

Applying a modern stain may seem like cheating, as it's basically trying to make one species of wood look like a different species, but that grey and green poplar is gross-looking.

Ordinarily, I would be finishing up with linseed oil at this point, but time is running very short, so tomorrow I'll apply a quick-drying varnish to protect from moisture and then get to final assembly.

Friday, October 9, 2015

Making a wooden akinakes scabbard, part V and last

Here you go:

The scabbard is finished with paints, in imitation of hide glue paints which we know were used on brain-tanned leather in more recent times.

My cast bronze chape from last semester is held in place with a pair of wooden pegs which pass through the front board of the scabbard and are glued down.  (Since none of the chapes I've seen which feature holes for these pegs have metal rivets or nails in place, I assume the pegs were organic.)

Lastly, a braided cord (cotton, unfortunately, but it's all I could find - and it is a period material, though preferably for high-status impressions) is tied tightly around the scabbard, with its knot in the back.  Both ends of the cord are sewn and tied off to prevent fraying, but on the long end, this step should be deferred until the cord is cut to its final length.  A little experimentation is needed to find the right length so the long end can pass comfortably around the thigh but not hang much below your knee or allow the scabbard to swing wildly when you run.  The short end is waxed so that it can compress enough to pass through the fluted brass bead and be knotted on the other side.

Sunday, September 13, 2015

Update: Cappadocian cloaks

Two years ago, I wrote that the Cappadocians wore square cloaks.  Experiments with unstitched fabric demonstrate that I'm an idiot.  Since only two corners are visible hanging in the front, and the lower hem appears to wrap straight around the body, the Cappadocian cloaks were apparently semicircular.

This will make cutting and (if necessary) finishing the edges a bit more complicated.  The semicircular version of the Roman paenula was similar, if longer - going by the Persepolis reliefs, the Cappadocian cloak was shorter than the knee-length tunic - so we should be safe using a paenula pattern.  Together with the arm fibula, this is what I intend to wear as rainwear to Marathon 2015.

Saturday, August 15, 2015

TDrevnosti

Just came across this shop on Etsy that features bronze Central Asian knives and akinakai which might be good for certain Scythian subgroup impressions. They are small but look nice.
TDrevnosti

Monday, July 27, 2015

A bronze shield cover from... ?

I've finally tracked down the Axel Guttmann violin-like shield I mentioned back in 2012.  It's not quite the shape of the violin shields seen at Persepolis and is much smaller (only 18 inches/46cm across).  Other differences are obvious upon viewing, and running the page through Google Translate I find that a "Prof. P. Schauer, Regensburg" (presumably Peter Schauer) assigns it a Hittite origin.  I don't know much about Hittite shields in the Iron Age, but in the late Bronze Age they used shields of a similar shape.  FWIW, Matt Amt has suggested that these gave rise to the Dipylon/Boeotian shield of Greece, thus raising the possibility that the Greek and Persian shields derive from a common ancestor.

Thursday, July 16, 2015

One more leather canteen

After reviewing the various craft supplies I'll have to order for Marathon 2015, and paying off a huge ER bill from that little eye accident in May, I've decided I can't afford a custom ceramic canteen.

That being the case, and what with waiting on some final decisions before finally putting in those orders, and my hands getting bored, I decided to make another leather canteen instead.

Although veg-tanned (and therefore molded) leather is probably not accurate for the Achaemenid period, I could at least aim for a better shape.  The one I made for Marathon 2011 is a blobby trapezoid with ears on either side of the neck, made according to the shape of the remaining leather scraps I had at the time, without thought to accuracy.  This new one is based on a clay canteen shown in OIP 69, plates 71 and 72 (pages 293 and 295 of the PDF).

This shape (I've always thought of it as "turtle-shaped") isn't very convenient; at just under four and a half inches/11.4cm across plus more than a quarter-inch of seams all around, it's a bit awkward to hold in your hand, but contains only around 14 ounces of water, a little more than a standard can of soda or beer.  One of the tapered bottle shapes would probably be more practical.

The leather is a Tandy economy shoulder, which I've been using up gradually over several years.  It seems to have been discontinued, but that's just as well because I don't like it and it's too heavy (around nine ounces) for most uses I put it to; I had to skive the pieces here by about a third.

In the original, the earholes were actually vertical, and grooves in the sides of the body indicated that the carrying cord passed all around the lower two thirds of the canteen.  I didn't think this would be practical to reproduce in leather; I think it would be prone to break.

.This time around, I made the stitch holes with a thin hobby awl rather than a drill or Dremel, and stitched with artificial sinew instead of dental floss (they're basically the same thing, but artificial sinew is much thicker).  It was a tight fit; I had to yank the needle through with a pair of pliers each time, but it was worthwhile because the seams don't appear to leak at all this time.  Just to be on the safe side, I went ahead and flash-sealed the inside seam with beeswax and melted more into the outside seams (which should also hopefully shield the artificial sinew; a lot of its own wax rubbed off while hot after the initial soak).

Wednesday, July 8, 2015

Thanks Alan Rowell for alerting me to motodraconis' new gallery of high-resolution photos from Naqš-e Rostam and Persepolis.

Tuesday, June 30, 2015

Making a gorytos, part III - belt attachments

I've never been able to track down evidence of how Achaemenid gorytoi were attached to the weapon belts beyond Persepolitan iconography.  That being the case, I have no idea whether my method resembles the original in construction at all, so all I can hope to do is make something that at least looks right and is functional.

The attachments are made to fit a flat suede band of the same type used for tying shoes.  They're cut and ground from 16ga. brass.  Since I have no drill press at the moment, I farmed out the drilling of holes and slots to Newtown Hardware House down the street.  I next rubbed a small half-round riffler over the edges of the slots to round them off and hopefully keep them from cutting into the leather too badly.


After being annealed one last time, the upper section of each slot is hammered using various steel bars and rods to shift it out of plane relative to the rest of the piece.


The leather band should now pass through the slots even when the attachments are held flat against a surface.


The attachments are to be nailed down, two on either side of the wooden spine, using oversized 5/8-inch upholstery tacks.  These are, unfortunately, only brass-plated steel, so they can't be polished; thus the brass belt attachments are left dull from annealing so as not to clash with the tacks' antiqued finish.  The usual arrangement of rivets or nails on the front of the gorytos seems to be a lower cluster of three and two pairs above it, but there are a few examples of a single upper pair, which is fortunate, as I ran out of brass plate at this point.

One last note:  Given the cross section that I picture for the wooden spine, it seems likely that the shanks of the lower attachments will have to be bent to angle upward and nailed in with great care.  Since the lower attachments are to be the load-bearing ones, the angle at which they would go in if they remained perpendicular to the inward-tilting surface seems like it would make them want to yank out under pressure.

Until archaeological findings come to light, it's not impossible that gorytos belt attachments were made in a manner similar to mine.  I would, however, sooner expect that if they were made of metal, they would have been cast to shape.

Friday, June 26, 2015

Plan for a gorytos spine

After further discussion with the good folks over at Hippeis, I'm going to see whether I can commission a carved external spine based on the ones seen at Persepolis (the type that I initially interpreted as a folded top strip of leather).  I may or may not be able to get a custom woodworker to create one for me.

It's a bit heavy-looking, but thin in cross section.  It is perhaps a concern that the wood in either the straight top or curved end would break easily since, if it's cut out of a plank, one section or the other will have a short, crosswise grain over a long area.  Splicing multiple pieces together could help alleviate this, but I'm not an expert woodworker, so we'll see what they have to say.

This design, with several inches of wood surface, gives the process advantage that the belt attachments can be simply nailed to the exposed spine after the leather is stitched down.

If it turns out I can't afford it, I'll fall back on the internal spine I've already made.  An exposed spine of flat cross section and uniform width and thickness would probably also be acceptable.

Monday, June 22, 2015

Making a gorytos, part II

Jesu, it seems to have been the better part of six months since I last posted on this topic, and we've only got another four until Marathon 2015!  Better get busy.

 The leather I selected is a smoked German-tanned buckskin from Crazy Crow Trading Post in the 14 to 16 square foot size.  To recap:  It appears that most leathers prior to the Hellenistic period were not vegetable-tanned but cured with fats in a process similar to brain-tanning.  The German tanning process is the cheapest widely-available example of such leather, and although it, unlike braintan, doesn't require smoking to preserve its integrity (due to the cod liver oil producing its own aldehydes), I believe smoked hide is preferable in the absence of evidence about what kinds of fats might have been used in Achaemenid times, plus the smoke masks the fish odor somewhat.

The 14 to 16-foot size gives plenty of hide for bowcase, cover and arrow pocket, plus some scraps for messing around with (I hope to use one as a hand wrap now that I'm learning how to shoot to the left of the bow staff, which is more painful).

Unlike a molded veg-tan, oil-tanned leather will require a spine to keep the gorytos from sagging when the bow is drawn.  Giannis Kadoglou pointed out to me that the gorytoi seen at Persepolis probably don't have an "upper strip" of leather, but a tall, exposed wood spine.  Similar ones are seen on the quivers from the temple of Aphaea statuary which included several archers in Asiatic dress.

However, I don't have access to a band saw at the moment, so I decided to use an internal spine made from a dowel.  This has been less than optimal.  My attempt at heat-bending it only went so far, and I wound up cutting the end into several pieces, sculpting them to fit and gluing and binding them to get a decent curve.

The leather is laid out and an outline of the bow and spine traced on with a pencil.  There has to be plenty of extra edge in the front to wrap around the spine and stitch to the back upper edge, locking the spine into its own little tube of leather.  I'm not sure I did well enough...

In any case, this is what the cut pieces look like before assembly.  You are looking what will form the inside surface.  I added one more bit to the curved end of the spine.

Flipping the main body over, the arrow pocket must be the first piece to be sewn.  It as well needs lots of slack, to fit the big blunt rubber arrowheads used in reenactment combat.  Since it's cut with extra room rather than stretched like a veg-tanned leather would be, this results in a highly puckered bottom edge.  I haven't figured out how to avoid that.

Next up will be tackling the belt attachment.

Monday, June 1, 2015

Don't try it 'till you nock it

The subject of Classical arrow parts other than arrowheads seems to have received less than its fair share of study, probably at least in part because everything except the point is organic and tends to decay.  I'm reliably informed by Hippeis poster arminius that reed arrows made from Arundo or Phragmites sp. require an insert or full separate nock.

The famous Epiktetos cup shows a Scythian's arrows with large C-shaped nocks.  For comparison, later wooden arrows from Miran in the Tarim Basin had bulbous wooden self-nocks that must have taken a great deal of work to shape.  Neither of these are snap nocks.  I prefer snap nocks, but it wouldn't be possible to create a profile like that with them.

As an exercise in exploring possibilities, I'm using cheap wooden beads (about a dollar a dozen) combined with bamboo skewers.  Other possible and likely more durable materials include bone and horn, but the wood is easily shaped and I think it will hold up well enough.

A cashier told me that the wood was probably pine and might splinter.  This hasn't happened so far, perhaps because I'm using very fine-toothed files - one backed, one round, to get the complex snap shape, which I may later reduce to a simpler and more open shape as per the historical examples.  I'm going to test them "raw" and perhaps rub glue inside if they do splinter with use.

Wednesday, May 27, 2015

Making a wooden akinakes scabbard, part IV

Akinakes scabbards were sometimes covered in embossed sheet metal, but judging from the number of bronze chapes presented in isolation in museum collections, I would have to think that scabbards were more often completely organic apart from the chape.  So here I am covering my scabbard in leather.  Fabric or thin rawhide would probably be equally acceptable.

As with the Medgidia-type scabbard, I laid the cut leather down with a thin brushing of contact cement (hide glue would probably work about as well, and be more authentic), trimming away the excess as I stitched.

Upon reaching the end of the seam, it's reversed and turned into a cross stitch.

At the other end, the shape of the expanded throat seems to make it likely that the leather there could peel off eventually (maybe that's why the top of the throat sometimes sloped back toward the middle?).  In this instance I drilled a very small hole through the core and put the thread through it, lashing the leather down in the process.

With that done, I made a cross cut through the leather where the belt loop is to be tied.  The cut in the leather can be cleaned up by putting a drop of glue into the hole and using a pencil or something to squash the corners down.

Tuesday, May 12, 2015

Converting the Native Way CH257

Alongside their G202, Native Way offers several models of Chinese bronze arrowheads that may be of interest to Classical reenactors.  The best prospect as far as I can discern is the CH257.

The smaller one above is the 257.  Wilkie Collins very kindly included a packet of  the larger CH259 with my order.  The 257, not counting the tang, is about 24mm (or a bit less than an inch), which would be on the small side for those used in the Graeco-Persian wars, but acceptable.  It weighs 12g as cast, more than half of which is in the tang.

The 259 is more attractive, with grooves giving the suggestion of triple flanges.  It's 49mm in the head and weighs 25g.  I think this is an acceptable length; definitely on the big side, but I've seen arrowheads at auction and antique dealer websites described as up to 50mm.  Still too heavy - but our techniques here should help that.

Mr. Collins describes them as armor-piercing.  I don't know anything about Chinese archery, but I can believe it.  They show a compact, sturdy cross section with little or no waste, and the tang would combine well with a bamboo shaft, resulting in a very tough, heavy arrow with plenty of momentum in a small area.

Occasional flawed castings may be found.

Chinese armor-piercer to Persian bantamweight

The first thing to do is grind in the flanges.  I've obtained a respirator for my foundry class, so grinding the leaded bronze with a Dremel shouldn't be a problem.  Here I'm using two different-shaped cutting bits to incise grooves and grind out the bulk of metal, and small files and rifflers to finish.  Finally they are sanded and then burnished with a steel brush.

The tangs are cut off with an angle grinder - wrap the heads in something like leather and hold them in a vise to accomplish this step safely.  Next the bases must be ground flat.

A post hole is drilled into a block of wood with a drill press.  The head is embedded in the hole to hold it steady.

The drill press is fitted with a 1/8-inch drill bit, brought down very slowly so as to let the cutting edges gradually shave at the bronze and not get jammed in it...

...  and the socketed arrowheads loosened with gentle hammer taps and extracted.  Weight is down to approximately 3g; a bit heavy for the size, but an excellent historical weight range for the type.  The heads can now be attached to reed or bamboo shafts using a wooden insert - I intend to use sections of bamboo skewer.

A lot of work?  Yes, admittedly, and attainable mainly because I have access to a drill press at the moment.  Also I still can't produce a finish as good as arrowheads that were cast as three-bladed.  But if you're in North America and have a drill press available, this is a very economical option.

Thursday, April 30, 2015

An akinakes chape from Bucks County

A side benefit of taking foundry at BCCC is being able to do a small personal project even in my first semester.

The positive is composed of Victory Brown sculpting wax in sheets pressed around the end of my wooden scabbard core, with additional lumps acting as filler.  The whole is scraped and rubbed smooth; detail is then applied by rolling tiny pieces of wax and squashing them onto the surface.

 Gating was indirect and complicated.  I attached one vent to the inside of the front because I didn't want to mess up the design on the outside.

Dipping, firing and pouring proceeded smoothly.  Divestment was a bit delicate, however, for obvious reasons.

About eight pounds of bronze were poured to make a casting of less than two ounces.  I had to tediously wear off all the stubs with carbide-edged die grinder attachments.

It was during the fitting process that I began to regret having put a gate on the inside.  In the end I even sanded down the scabbard core a little in desperation - a loose fit will be necessary because the scabbard is to be covered in leather.  Since these chapes are usually found with the holes at the top empty, I speculate that they were held in place with organic pins, probably wood.

Divesting had to be continued on the inside entirely through sandblasting so as not to deform the walls with hammer blows.

The finished chape, after sanding with 400- and 1500-grit paper and burnishing with a steel wire Dremel brush.  I intend to create a permanent rubber mold from it before applying a finish of clear wax and attaching it to the scabbard.