Showing posts with label chape. Show all posts

Thursday, April 30, 2015

An akinakes chape from Bucks County

A side benefit of taking foundry at BCCC is being able to do a small personal project even in my first semester.

The positive is composed of Victory Brown sculpting wax in sheets pressed around the end of my wooden scabbard core, with additional lumps acting as filler.  The whole is scraped and rubbed smooth; detail is then applied by rolling tiny pieces of wax and squashing them onto the surface.

 Gating was indirect and complicated.  I attached one vent to the inside of the front because I didn't want to mess up the design on the outside.

Dipping, firing and pouring proceeded smoothly.  Divestment was a bit delicate, however, for obvious reasons.

About eight pounds of bronze were poured to make a casting of less than two ounces.  I had to tediously wear off all the stubs with carbide-edged die grinder attachments.

It was during the fitting process that I began to regret having put a gate on the inside.  In the end I even sanded down the scabbard core a little in desperation - a loose fit will be necessary because the scabbard is to be covered in leather.  Since these chapes are usually found with the holes at the top empty, I speculate that they were held in place with organic pins, probably wood.

Divesting had to be continued on the inside entirely through sandblasting so as not to deform the walls with hammer blows.

The finished chape, after sanding with 400- and 1500-grit paper and burnishing with a steel wire Dremel brush.  I intend to create a permanent rubber mold from it before applying a finish of clear wax and attaching it to the scabbard.

Sunday, January 4, 2015

An ivory chape at the MFA

Not sure whether there's any practical value in posting this, as it's unlikely any of us will be replicating it, but it does demonstrate the existence of isolated chapes made of solid ivory.  It's the standard goat motif - again - although exact provenance is not provided.

Sunday, November 16, 2014

Making a wooden akinakes scabbard, part III

Next up is finishing the tab.  Drilling a large enough hole for the attachment is simple enough.  But since the little ear where the suspension is actually attached looks like a weak point to me, and furthermore pine is a rather weak wood to begin with, I'm trying to reinforce it, using sheet brass and epoxy.  I don't know of any evidence for this sort of feature; probably the originals were made of a stronger wood.  But it'll be covered with something (probably leather).


The chape is proving problematic.  The originals were most commonly made of bronze and sometimes bone.  Since I can't cast bronze yet and am having trouble finding a useable lump of bone (it should probably be made of the knuckle end of a cow, sheep or goat leg bone) here I'm using wood as a stopgap measure.  Wood is only this side of allowable on the precedent of the scabbard from Egypt, and it should be replaced presently.


Again it's the very common goat motif, though others are sometimes attested.  Unfortunately, what I thought was maple has turned out to be something quite a bit softer and more open-grained, also of less uniform hardness, so this carving is cruder than I'd like.  I'll probably attach it with rubber cement so it can be easily pulled off when the time comes.  A good friction fit will do most of the job, but a little adhesive is necessary, as I learned by nearly losing my pewter chape in the sand at Marathon 2011.

Wednesday, June 12, 2013

Not new, but improved

Update 12/10/13:  This post contains information that is probably incorrect.  Please see here.

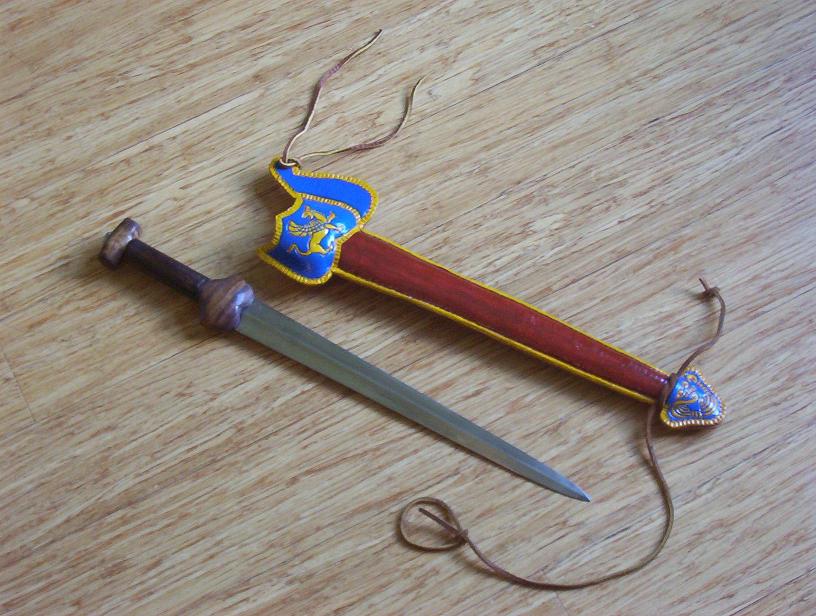
You may recall that last year, my swords were angular things in a rough scabbard with a pitted, home-cast pewter chape and ragged metal throat.

I'd long planned to replace them entirely with longer swords and all-new scabbards with sheet brass throats.  However, my research on the handful of akinakes finds that are clearly associated with the Achaemenids points to these weapons actually being quite small, though larger ones existed elsewhere in the Classical world (among some Scythians, for example).  As such, I'm keeping the ones I have, but I've reshaped the wooden hilt components to be more in line with iron examples.  The new hilts are vastly more comfortable to hold.

The scabbard needed to go, though.  The only evidence I've found for how Achaemenid scabbards were built indicates that they were made of wood.  Since I have not the time or tools to shape large pieces of wood, I've decided to go another route.  It's experimental and difficult to achieve, but the result has been acceptable.


The new scabbard is made of two layers of heavy (in this case, roughly 7-ounce) vegetable-tanned leather - the best type for this use; it stretches when wet, holds whatever shape you give it, dries stiff, and when it's still a bit damp, you can tool it to your heart's content, making it an easy-to-work alternative to the embossed metal covers used on fancier Medo-Persian scabbards.

The scabbard is made, like a wooden one, out of a front and back face.  These were cut out flat and sewn as per a two-piece knife sheath, but without a welt.  They were then soaked and a wooden scabbard core inserted.  This was the hardest part of the project:  The core was too thick, so I had to shave away a ton of wood on the outside until it fit.  A better technique may be to dispense with a core and just make the sheath welted, allowing it to dry with the sword inside (wrapped with scotch tape or something) to hold its shape.


Afterward, I stuffed the throat with tissue paper until it ballooned enough to accept the scabbard throat.


It's still a bit tight because of the inward curve near the top of the throat.  Luckily, the guard on my sparring sword is somewhat smaller and comes out with no trouble.  Iron hilts are less bulky and would be even less disposed toward this problem.


A leather thong is tied around the scabbard just above the chape, leaving two trailing ends, a long and a short.  When worn on the right hip, the short end points forward and ends in a bead or, as here, a small knot.  The long end loops (not ties) around the right thigh and ends in a slipknot, which is then tightened around the short end.

The chape is also leather, and should be replaced with one of bronze or bone when I can do so.  It features an abstract, curled-up goat, one of the most common motifs used on Achaemenid chapes.


The back of the scabbard is partly waxed to provide a water-resistant finish that won't rub off and contrasts nicely with the undyed back of the throat and chape - first painted with melted paraffin (beeswax would be the preferred ancient material), and, when that didn't work, held over a heater until the leather heated enough to absorb the wax.  Otherwise, the scabbard is finished with modern acrylic paints, as unfortunately I have not yet figured out what ancient paints to use.

Monday, August 13, 2012

An all-wood akinakes scabbard

The British Museum has some good-resolution profile shots of an akinakes scabbard showing an alternative method of construction.  It is made of just two pieces of tamarisk wood, mirror-image front and back halves.  The chape and throat are presumably also integral to these halves, although they seem to carved to represent separate pieces.  The shell-like carved throat would eliminate any need for clever methods of shaping to make it wide enough to cover the sword's guard.  An unidentified white paste was used to cover the scabbard in gold sheet, most of which is now gone.

This find does not contradict the existence of separate chapes, which are well-attested archaeologically.

Tuesday, May 15, 2012

How to make a scabbard

Update 12/10/13:  This post contains information that is probably incorrect.  Please see here.

10/24/13 - Please read!
Since this post appears to be getting more and more pageviews, I feel the need to update it in some way.  All the scant evidence I have subsequently gathered on akinakes scabbards indicates that the following method is NOT CORRECT for the Achaemenid period.  Please do not use it in your own replica.  See here for further information.  I am nonetheless leaving this post unaltered.

Scabbards are tedious to make, but not difficult.  If you'd like an even easier method, I'm including instructions for an all-leather sheath at the end of this article.  Pending evidence to the contrary, XMFM accepts all the following methods.  As always, check your group's guidelines before deciding what to do.

The author's rough draft Achaemenid scabbard (bottom) with tin can throat and home-cast pewter chape, and Scythian-style leather sheath (top).

For a wood-cored scabbard, cut two planks slightly wider and longer than the blade.  They may be thick, with deep hollows carved on the inside faces to fit the blade, or thin and held apart with additional strips of wood so the blade fits between (though even in this case it's better to have them a bit closer together and do a little hollowing, so the fit is snug).  File indentations at the top to seat the lobes of the sword's guard.  Glue the halves together along the edges, and sand smooth.
Two ways to make a wood core.  The first is more time-consuming.

Making a pattern for the metal throat.

(Top)  Wrap a sheet of foil or paper around the top of the core.  It should project somewhat higher so that the tab can rise higher than the actual scabbard mouth, as in the originals.
(Bottom left)  Draw the throat on, then add extra width around the tab.  This will be used to crimp around either the front or back half and hold the tab together.
(Bottom right)  Remove the wooden core, cut the throat pattern out, then cut the extra width off of either the front (if you want the back to crimp around the front and be visible) or back (if you want the crimping hidden).

Trace the pattern onto a sheet of brass or bronze and cut it out.  Add little cuts around the edge of whichever half of the tab is wider so that it will crimp neatly.

You'll probably want to cover the scabbard in leather.  Select a soft, thin leather that will be easy to wrap closely.  I use dental floss for all my leather stitching, but for this application I think ordinary thread would suffice.  Measure out at least four times as much of it as the length of the seam you're making (more may be needed if you space the stitches closely, but I've always found four times to be enough).  A double-running or Holbein stitch is easy and secure.  Wrap the leather tightly and stitch either up the back of the scabbard and then down, or down and then up - either way, the end of the seam will be protected by either the throat or chape.  Tie off the thread tightly and trim down the ends.

Some Achaemenid scabbards had a ridge visible down the front.  I don't know how this was created.  I approximated it by inserting a bamboo skewer under the leather.

Stitching up the back.

If you want a fancy scabbard, you could cover the core in embossed brass/bronze sheet instead of leather.

Wrap the metal throat around the top of the scabbard, just like the throat pattern.  Crimp the edge of the wider tab half around the smaller half and hammer the crimping down.  You may also want to sand or file to reduce the raggedness.  Punch a hole through the upper corner of the tab and set a metal grommet through the hole.

I have not found an acceptable chape on the market, but this isn't a problem if you can do home casting or there's a small-item casting studio near you - check the yellow pages or online.  Make the chape out of sculpting wax, rounding the edges and scraping the surfaces smooth.  Decorate it if you like.  Then have it cast in a metal (bronze or brass) that closely matches the metal you used for the throat.  Sand and polish, then glue it over the end of the scabbard with epoxy or other high-strength adhesive.

I have no experience with bone carving and won't try to describe the process, but if you have the skills, feel free to make a chape in bone instead.

Alternately, you can make both throat and chape out of heavy (around 8-ounce) leather.  The instructions for a leather throat are pretty much the same as for a metal one, except that you'll stitch instead of crimp the halves of the tab together, so don't make one wider than the other.  Also, when tracing the pattern onto the leather, do make the middle of the throat pattern - where the side of the finished throat opposite the tab will be - a little bit (say, a quarter inch) wider than it is on the pattern, to account for the thickness of the medium and shrinkage.  Soak the throat after cutting to be able to mold it closely to the scabbard.  Sufficiently heavy leather will require you to punch or drill the stitch holes before stitching, using an awl or very small drill bit.  You don't need to add a grommet to the tab.  The chape is also made from two halves, stitched together, soaked and stretched over the end of the scabbard.  Allow both chape and throat to dry.  They'll probably shrink and either fall off or prove easy to pull off.  Glue them back on.

Lastly, punch a hole in the weapon belt at your right hip.  Insert a leather cord through the tab grommet and tie it through the hole in the belt.  Measure out another cord and tie one end around the scabbard just above the chape, leaving two or three inches of extra cord on the forward edge of the scabbard (the same side as the throat tab) and the rest on the backward edge.  Tie the forward end into a slipknot.  Tie the backward end of the cord into a small tight knot or attach a bead.  Loop the backward length of the cord around your right thigh, then put the knot or bead through the slipknot and tighten it.

But I'm too lazy
A leather sheath can be made in just a few steps.  Draw your sheath on the flesh side of a heavy leather sheet.  Cut it out, flip it over and use it as a pattern for the other half.  Drill stitch holes, stitch the two halves together, punch a hole in the tab, add the belt and thigh cords - and you're done!  If you like, you can now decorate the front of the scabbard with tooling.

I have no documentation that sheaths were made in this manner.

Important update (Sept. 14, 2012):  See A further note on leather sheaths to avoid this project being a huge waste of time and material.

Edit:  I've noticed that I reversed the directions regarding the slipknot system when posting earlier this morning.  Just to be clear:  The slipknot is at the shorter forward end of the cord.  The bead is on the end of the cord that loops around the leg.

Next up:  You're no better than Raskolnikov—