Well, Plataea 2022 ended on Saturday and although there's a lot to be said, I'm limiting myself to some observations to bear in mind about all the stuff I brought out there:
- A four-inch-wide (internal), eight-foot-long PVC pipe with caps held on by duct tape makes a very protective package for spears, but it's so heavy and awkward (particularly when you already have two suitcases and a rifle case with your bows and arrows in it), and expensive to ship, that I wound up leaving both it and all my spears spears with other reenactors who felt they'd have a use for them and less difficulty/expense transporting them. I will not travel with spears in the future. If I send any more to Greece, I'll send them well ahead of time by the cheapest service available and leave them with a trusted friend.
- Under the (to my Pennsylvanian standards) quite aggressive heat and sun, the film of linseed oil-beeswax sealer I applied on top of the oil paint on my crescent shield softened and rubbed off. Specifically, the area on top of the dark red ochre-painted part of the shield; the area on top of the white edge was somewhat more resistant (presumably because the film is transparent and the dark paint heated up in the sun faster). The same mixture used as a paint binder on my new gorytos was also more resistant, but did soften after prolonged exposure, allowing thicker bits to be scraped off. The rosin-beeswax glue attaching the leather facing of my new akinakes scabbard also softened. By contrast, anything treated, bound or sealed with only linseed oil or rosin (the ochre paint on the shield, the spear handles, and the sinew wrappings of my arrows) were all fine. So basically anything containing beeswax was in danger of melting.
- The buff leather weapon belt performed admirably. The chrome-tanned belt sagged and became uncomfortable. I'm not sure whether this is because the holes I punched in the buff belt allowed it to be laced tighter or because it's a thicker leather, but I suspect both. The belt being nice and snug was definitely helpful.
- As I suspected, the smaller bow and commensurately smaller gorytos and arrows were much easier to carry. The search for an accurately Classical-styled bow of less than 36 inches strung continues.
- The 1/2-inch-thick wooden crescent shield is at least as heavy as larger wicker ones in the same style. This, too, needs improvement. I also threw together a round wicker mat with pelta-style grips and a suede facing, which at 16 inches in diameter (about the size of the smallest Scottish targes, and barely large enough to cover my arm from elbow to knuckles with fingers closed around the handgrip) is so light I barely notice I'm wearing it, but I'd have felt much, much better about it if it were crescent-shaped.
- A 12-ounce ceramic bottle, while convenient to carry, is only around a quarter as much water as I need to drink over the course of a Greek midsummer day in the field. Also, water left out becomes as hot as the surrounding air in just a few hours. What I wound up doing was to take a two-liter plastic bottle of water and keep it overnight in the hotel minifridge where it half-froze, wrapped it in spare clothing and kept it in my tent in my suitcase. That way I could still at least refill my ceramic bottle with slightly cool water by the end of the day. A proper cooler with ice blocks would've been better.
- Food must be kept elevated or it will be invaded by ants. A table of some kind, a crate, a box, anything will help.
Showing posts with label gorytos. Show all posts
Showing posts with label gorytos. Show all posts
Wednesday, August 3, 2022
Various practical addenda from Plataea 2022

Wednesday, June 29, 2022
Pieced gorytos, part V and last


Sunday, May 29, 2022
Pieced gorytos, part IV
It took much longer for the paint to cure than I expected, as the slight grooves between the plywood face and veneer edge held accumulations that were thicker and took longer to oxidize. Once this was done, I tried to attach the leather to the spine with pitch glue. However, I was reluctant to keep the pitch glue melted with the heat gun for fear it would make the veneer edging delaminate. All this could be avoided if I could figure out how to make a solid wood spine, but in the end, I peeled off the pitch glue, reattached the leather with rubber cement and finally started drilling a few days ago.
 The stitching is soft hemp twine from a craft store, which I drew back and forth over a block of beeswax to lubricate it and reduce fraying. I'm not sure exactly how much I used, but I spooled out about 24 feet more than necessary, which does make the stitching process tedious.
I spaced the stitch holes half an inch apart and marked them with a pen on the leather, then ran the gorytos under the drill press. The size of the drill bit is dependent on the thickness of the twine. In this case, a 3/32" bit was just right. I could lace the first running stitch by hand with care. After drilling, I scrubbed the sawdust off with a stiff nail brush.
 When doubling the running stitch, I had to flatten the end of the twine and put it on a needle. As the stitch hole was now crowded with the first stitch, I occasionally had to draw the needle through with a pair of pliers, but this became less often necessary as my fingers got sticky with beeswax.
After completing the stitching, I tied the twine off a bunch of times and cut it with about two inches of excess.
 The fit is a little more snug than I'd like; I think the string and tip of the bow should not rub against the spine at all, so an extra inch of leather would've been a good idea. This leather will stretch with time, but whether it will stretch enough is another question.
Anyway, the next step will be to make the belt attachments and then the cover.

I spaced the stitch holes half an inch apart and marked them with a pen on the leather, then ran the gorytos under the drill press. The size of the drill bit is dependent on the thickness of the twine. In this case, a 3/32" bit was just right. I could lace the first running stitch by hand with care. After drilling, I scrubbed the sawdust off with a stiff nail brush.

After completing the stitching, I tied the twine off a bunch of times and cut it with about two inches of excess.

Anyway, the next step will be to make the belt attachments and then the cover.
Tuesday, April 26, 2022
Pieced gorytos, part III
I wanted to make the spine from solid wood, but was still concerned with it snapping across the curved part. Historically, there may have been several solutions to this problem: The spines may have been very thick and heavy, made of naturally curved branches, boiled or steamed and then bent, made in two crossgrain plies and glued like the one I made in 2015 (which nonetheless did snap when I fell on it), sheathed in metal to reinforce them, actually made of metal, or just treated with great care and/or replaced as soon as they did break. I have no evidence for any of these methods.
 In any case, what I wound up doing was cutting the spine from plywood. This is, of course, the only method I can say for certain is not historical, but seemed to me the only one feasible at the moment. I cut it on a scroll saw and smoothed the edges on my mini-belt sander. Unfortunately, the edges are very clearly plywood and provide an easy entry point for water and grime, so my next step was to apply veneer edging intended for just this purpose. This is a paper-thin continuous strip of wood with a hot glue backing, which is melted with a clothing iron, heat gun or other source of heat and pressed into place.
 I edged the exterior and the interior, which will be rubbing against the bow. The half-inch veneer edging turned out to be slightly wider than the half-inch plywood is thick, so I next had to trim off the overhang.
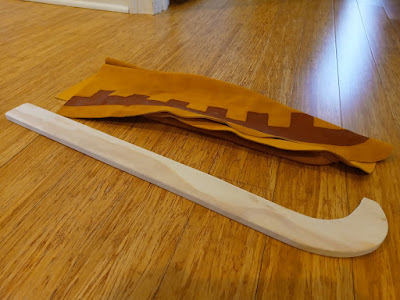 After that, I sanded the spine to 320 grit, rounding off all the sharp corners as I went. This having been done, I still found its appearance unconvincing somehow. On close inspection, it simply does not look like solid wood.
 Ultimately what I've done is covered the whole thing with simple ochre oil paint (except the inner edge, to prevent it from rubbing off on the bow). This not only masks the grain, but also fills in splintered flaws in the wood and provides some sealing against moisture. The paint I mixed up was a little thick. If it turns out to begin crumbling off the surface too easily when cured, I'll rub it down with a little extra oil and/or wax. Otherwise, it should be roughly another week before I can stitch the main pocket on.


Monday, February 7, 2022
Pieced gorytos, part II
After about a week and a half, the paint was completely cured. I moved onto the next step, stitching the arrow pocket.

 Instead of glue, I kept the arrow pocket in place this time with staples. This is a bit destructive, but easier than using a period glue, and ancient people could easily have achieved the same thing with pins.
 The pocket is attached to the back with 40-weight waxed linen thread using a simple double running stitch and pulling out the staples as I went. Its long edges are brought together slightly to give the pocket the fullness needed to accommodate arrows, particularly the large, blunt rubber arrowheads we use during combat reenactment. This means some ugly crimping on the short edge. I tried to distribute the slack evenly during the stapling process, but it wound up a little uneven.
 The lower edges of the body panels are carefully lined up and stapled first at both ends, then in the middle, then equidistant between these three and so on. I wound up using nine staples in this manner; given the length of the edge, they seemed to be the right distance apart. Note that some of the linseed oil seems to have soaked into the leather. Time will tell if this is going to be a problem. The paint doesn't scratch or rub off easily, so I think the paint itself will hold. Whether the oil will have a negative effect on the leather is another question.
 I'd meant to stitch the lower edge completely flat, but it seemed to develop slack as I moved from the upper end to the lower and I wound up puckering the seam a bit to shorten it (pulling the thread diagonally downward from the seam a little to pull the stitches closer together). This appeared to work.

 On the whole, I'm satisfied with how this project has gone so far. The next step (creating a curved spine that won't break too easily) is going to be a major challenge.
Thursday, January 20, 2022
Pieced gorytos, part I
Since Marathon 2015, I've wanted a bowcase that isn't nearly as big as I am for the running around and shooting part of reenactments. This requires a smaller bow, of course, but a bowcase that fits more closely to the bow's outline will present less area when viewed from the side. In fact, the Scythian/Persian gorytos in Greek art does tend to have an outline on the lower edge that follows the curve and reflex of the strung bow staff closer than could be achieved without either building the gorytos too tight and stretching the leather or having a seam. This suggests that the main pocket is made in two parts. A construction method like this would also allow the bowcase to be made from smaller hides or hides with flaws that mean they have to be cut into smaller contiguous pieces.
 The bow I'm using as a model is Ali Bow's Mini Han; not quite right for our period with its wooden siyahs, but at just under 34 inches/86cm strung, it's the smallest recurve I can find that still looks like a bow and not a toy. I may eventually replace it if a truly tiny Scythian-style bow becomes available, but I have been warned that resin bows may crack with repeated use, so I'm going with the all-fiberglass Ali for the time being.
The hide is Crazy Crow's AA Grade Gold Buckskin. It's grain-on, but the flesh side has a short, even nap similar to wet-scrape leather that can be the outside. The color, gaudy though it may look, is actually close to that produced on braintan by smoking over certain species of wood.
 After cutting out the body pieces, I determined which one would face outward when worn in "marching" position and traced it onto heavy cardstock.
 At first I tried drawing the crenellations freehand in black ink, but then realized it was coming out too sloppy. I then used a yardstick and divided the length into 1-1/2-inch squares with a 1-1/2-inch top strip.
 ... and hatched the parts to be removed...
 Cutting the crenellations was too tedious for me, so I used an X-Acto over a wooden plank for that part.


 Pieces of the cutout make perfect reinforcements for the ends of the stencil. Plenty of tape on both the front and back ensures that no pieces of card stick out and snag on the leather.
 Test-fitting the stencil. I made the curved end a little too long; the pointed tip will probably wind up inside the folded lower seam.
 To prevent the leather and stencil from moving too much in relation to each other during the painting process, the stencil is taped along the back edge of the leather and on the front as much as possible without entering the stencil area.
 This is the first time I've used the beeswax-linseed oil paint on an actual project. It's colored with red ochre. I may have added too much beeswax, as the mixture became very firm when cold. A little goes a long way, since much of the paint is scraped off and then reapplied further down. For this case, which is about 22 inches/56cm long not counting the margin where it will be stitched to the spine, I used roughly a tablespoon of paint. It will next have to cure for some days. I think it's important to get this step done before any assembly, because I can't imagine rubbing and scraping the paint into the suede on anything but a flat surface.

The hide is Crazy Crow's AA Grade Gold Buckskin. It's grain-on, but the flesh side has a short, even nap similar to wet-scrape leather that can be the outside. The color, gaudy though it may look, is actually close to that produced on braintan by smoking over certain species of wood.
Monday, February 29, 2016
Deve Hüyük - the full catalogue
Following Friday's post, I found Roger Moorey's catalogue of finds. It was embarrassingly easy and I don't know why my earlier searches didn't turn it up, but here goes anyway. Although most of what's shown is in the form of line drawings, it's still a rich gallery of objects common to our time period.
An important note on time periods: The site as a whole comprises several phases. Deve Hüyük I seems to be Neo-Assyrian, while Deve Hüyük II is Achaemenid. There's also a few Arsacid-period graves in phase II; these are termed Deve Hüyük III. Therefore if you're interested in any particular object, you need to confirm which phase it belongs to.
Moorey states, on the basis of the long sword and hilt fragments from Persepolis (see OIP #69), that the flanged dagger was used throughout the Achaemenid period. He also lends some credence to something I've long suspected, that this dagger is the same as the "Elamite" dagger worn by robe-clad Persians and Elamites in period art.
There's a lot of highly decorated pottery, including several "flasks" shaped like pointed amphorae but without handles. A canteen broadly similar to the ones from Persepolis but slightly different in detail is here described as a "pilgrim flask," while another, highly decorated glazed one is considered to be of Egyptian influence.
Those looking to add more flare to high-class impressions may look to the variety of bronze bracelets, anklets, rings and earrings, many of which should be simple to fabricate from metal rod or strips with annealing and filing. Beads of all sorts of materials appear, as well as small, ceramic human head and animal pendants.
Among toiletries are a pair of tweezers, several circular bronze mirrors, and tubes and applicator sticks for kohl, a kind of eyeliner. The kohl tubes and sticks are not necessarily feminine accessories, as Xenophon claims that Astyages, like other Median men, wore "pencillings beneath his eyes." (Some of the attached codes may clarify this but I'm only skimming for the time being.)
Achaemenid bronze bowls, rhytons, iron akinakai, sagarides, arrowheads, tanged javelin heads, a second gorytos cover decoration, snaffle bits, arm fibulae and cylinder seals mostly reinforce what we already know. One socketed trilobate arrowhead is attached to a bronze chain for some reason, and most of the spearheads run to proportionally rather narrow, though they may have corroded at the edges. There's also a bronze bell described as a horse fitting.
An important note on time periods: The site as a whole comprises several phases. Deve Hüyük I seems to be Neo-Assyrian, while Deve Hüyük II is Achaemenid. There's also a few Arsacid-period graves in phase II; these are termed Deve Hüyük III. Therefore if you're interested in any particular object, you need to confirm which phase it belongs to.
Moorey states, on the basis of the long sword and hilt fragments from Persepolis (see OIP #69), that the flanged dagger was used throughout the Achaemenid period. He also lends some credence to something I've long suspected, that this dagger is the same as the "Elamite" dagger worn by robe-clad Persians and Elamites in period art.
There's a lot of highly decorated pottery, including several "flasks" shaped like pointed amphorae but without handles. A canteen broadly similar to the ones from Persepolis but slightly different in detail is here described as a "pilgrim flask," while another, highly decorated glazed one is considered to be of Egyptian influence.
Those looking to add more flare to high-class impressions may look to the variety of bronze bracelets, anklets, rings and earrings, many of which should be simple to fabricate from metal rod or strips with annealing and filing. Beads of all sorts of materials appear, as well as small, ceramic human head and animal pendants.
Among toiletries are a pair of tweezers, several circular bronze mirrors, and tubes and applicator sticks for kohl, a kind of eyeliner. The kohl tubes and sticks are not necessarily feminine accessories, as Xenophon claims that Astyages, like other Median men, wore "pencillings beneath his eyes." (Some of the attached codes may clarify this but I'm only skimming for the time being.)
Achaemenid bronze bowls, rhytons, iron akinakai, sagarides, arrowheads, tanged javelin heads, a second gorytos cover decoration, snaffle bits, arm fibulae and cylinder seals mostly reinforce what we already know. One socketed trilobate arrowhead is attached to a bronze chain for some reason, and most of the spearheads run to proportionally rather narrow, though they may have corroded at the edges. There's also a bronze bell described as a horse fitting.
Monday, October 19, 2015
Making a gorytos, part V and last


Drilling for stitch holes would've been much easier if I'd had a drill press, as holding a heavy power drill stable while pressing it down via a thin metal rod was precarious, and I broke one drill bit in trying to do so. The size of needle and artificial sinew I used worked best with a 5/64-inch bit. Not to mention a drill press would've allowed the holes on the back side to come out in a neater line.
On the other hand, I soon found that the leather edge on the back was a little further back than on the front, so with the power drill I was able to angle the holes in slightly.


I worked up the design on mine lightly in ink, with a little calculating of the available space for each square and measuring to keep the dots exactly halfway between the squares and the gorytos' edge. The paint would go a little bit over the lines to cover them up.

At this point, the bowcase would be functional and ready to take to the show, but not quite finished to the degree that I would like.

To prevent the fit over the bow from being too sloppy, the seam should be no wider than necessary, so some trimming can be done at this stage. I can't say I know for certain what a good width would be, as mine didn't turn out with a good precise fit anyway, but a quarter-inch seemed about right for strength.
Mark the seam as above. Using more ink is fine, since it won't be visible on the finished cover.


Monday, October 12, 2015
Making a gorytos, part IV - spine construction
I've had some difficulty keeping in contact with custom woodworkers to get this spine made, but if a reciprocating or band saw is available (luckily my uncle had one), a flat J-shaped spine may be pieced together from a plank.
 To begin with, the leather gorytos body is used to trace a cardboard pattern.
 The pattern is traced in sections onto a 48x6x1/4-inch poplar plank (the ones from Home Depot actually measure 5.75 inches wide).
 The cut pieces are to be made into a two-ply spine with the grain of the two layers running perpendicular to each other, to hopefully reduce the risk of splitting. The lengthwise-grain pieces will be on the left (outside) of the spine when the gorytos is worn on the left side of the body with the curved end pointing forward.
Due to the aforementioned slightly inaccurate labeling, an extra 1/2-inch-wide piece needed to be added to the lower end of the curve on the lower face.
 The spine is glued together with a waterproof wood glue, and placed on a flat surface to dry. Using scrap wood, half an inch of shims are placed all around it to make sure the weights sit evenly.
 Twenty volumes of an encyclopedia form the weights to try to keep the spine completely flat as it dries.
 I let the spine dry for two days to be absolutely sure it wouldn't warp. Since the inside edge won't be visible, it only requires further cleanup if there are any large pieces jutting inward. The outside should be shaved and sanded if necessary to achieve evenness between the two layers; the edges can also be rounded.
 Either the floor or distribution of weights must not have been perfectly flat. Lamination failed at one point where the back layer bent away from the front. I worry that if this bit is allowed to flex in relation to the rest of the spine, it could crack. I think this is an unlikely concern, but there's no point in risking it.
After the wood putty dries, the area is shaved and sanded down.
 Applying a modern stain may seem like cheating, as it's basically trying to make one species of wood look like a different species, but that grey and green poplar is gross-looking.
Ordinarily, I would be finishing up with linseed oil at this point, but time is running very short, so tomorrow I'll apply a quick-drying varnish to protect from moisture and then get to final assembly.


Due to the aforementioned slightly inaccurate labeling, an extra 1/2-inch-wide piece needed to be added to the lower end of the curve on the lower face.


After the wood putty dries, the area is shaved and sanded down.

Ordinarily, I would be finishing up with linseed oil at this point, but time is running very short, so tomorrow I'll apply a quick-drying varnish to protect from moisture and then get to final assembly.
Tuesday, June 30, 2015
Making a gorytos, part III - belt attachments
I've never been able to track down evidence of how Achaemenid gorytoi were attached to the weapon belts beyond Persepolitan iconography. That being the case, I have no idea whether my method resembles the original in construction at all, so all I can hope to do is make something that at least looks right and is functional.
 The attachments are made to fit a flat suede band of the same type used for tying shoes. They're cut and ground from 16ga. brass. Since I have no drill press at the moment, I farmed out the drilling of holes and slots to Newtown Hardware House down the street. I next rubbed a small half-round riffler over the edges of the slots to round them off and hopefully keep them from cutting into the leather too badly.


After being annealed one last time, the upper section of each slot is hammered using various steel bars and rods to shift it out of plane relative to the rest of the piece.


The leather band should now pass through the slots even when the attachments are held flat against a surface.


The attachments are to be nailed down, two on either side of the wooden spine, using oversized 5/8-inch upholstery tacks. These are, unfortunately, only brass-plated steel, so they can't be polished; thus the brass belt attachments are left dull from annealing so as not to clash with the tacks' antiqued finish. The usual arrangement of rivets or nails on the front of the gorytos seems to be a lower cluster of three and two pairs above it, but there are a few examples of a single upper pair, which is fortunate, as I ran out of brass plate at this point.
One last note: Given the cross section that I picture for the wooden spine, it seems likely that the shanks of the lower attachments will have to be bent to angle upward and nailed in with great care. Since the lower attachments are to be the load-bearing ones, the angle at which they would go in if they remained perpendicular to the inward-tilting surface seems like it would make them want to yank out under pressure.
Until archaeological findings come to light, it's not impossible that gorytos belt attachments were made in a manner similar to mine. I would, however, sooner expect that if they were made of metal, they would have been cast to shape.
Subscribe to:
Posts (Atom)